


ZFS is a very powerful filesystem and volume manager that offers incredible flexibility and resilience. But computers are made up of hardware, and hardware breaks. Like any other component of a computer system, there are times when problems arise that require the attention of the operator to properly resolve. The power and complexity of ZFS can sometimes leave users unsure of what to do when they run into an issue or find themselves needing to resolve an error that they are experiencing.
In this article, we'll go over some simple issues that a ZFS user may run into and how to address them.
Issue 1: Checksum errors in zpool status
 pool: zroot
 state: ONLINE
config:

        NAME                     STATE     READ WRITE CKSUM
        zroot                    ONLINE       0     0     0
          mirror-1               ONLINE       0     0     0
            da2p2                ONLINE       0     0     0
            da3p2                ONLINE       0     0     0
          mirror-2               ONLINE       0     0     0
            da4p2                ONLINE      10     0    24
            da5p2                ONLINE       0     0     0
If your monitoring detects an issue, or you run zpool status manually and notice that these error counters are not all 0, the first thought a user might have would be: "Is my data ok?" If you see values in the Read, Write, or Cksum columns, but no warning in the header or footer about unrecoverable files, your data is most likely fine...however, you will need to take a few steps to ensure that the situation does not deteriorate further.
Usually when values appear in these columns, it is a sign that one of your disks is starting to fail. Before doing anything, check to make sure you have a recent backup, just in case.
Next, check the SMART data for the disk in question and see if it reports anything out of the ordinary.
smartctl -x /dev/da4
Take notice of any results for "Current_Pending_Sector” or "Reallocated_Sector_Ct" on SATA disks, or for SAS: “Total uncorrected errors”.
Attribute number 5: Reallocated_Sector_Count, Type: Pre-fail, Raw value: 80
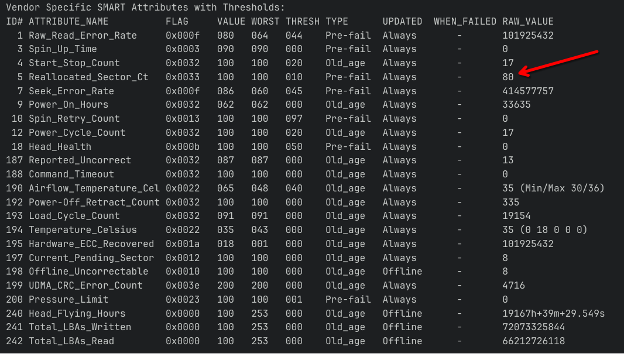
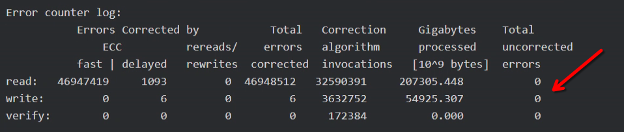
Error Counter Log: Total uncorrectable errors: 0
If nothing stands out, run a short SMART test.
smartctl -t SHORT /dev/da4
Num   Test_Description   Status                   Power_on_Hours   Failing_LBA   NSID   Seg   SCT.  Code
0     Short              Completed without error  6248                       -      -     -      -     -

If the test fails, replace the disk as soon as possible; if the test passes go ahead and launch a LONG smart test.
smartctl -t LONG /dev/da4
Similarly, If the long test fails, replace the disk; if the test passes, start a scrub on the pool to verify the checksums of all data, to detect and correct any further errors on any disk.
The ZFS scrub will verify the checksum of every data block to ensure it was able to be read back correctly. If it detects any issues, it can use the redundancy provided by mirroring and RAID-Z to correct the error, writing the corrected data back to the disk. Detecting such errors early allows them to be resolved before additional errors accumulate that may be beyond RAID-Z’s ability to heal.
zpool scrub zroot
If the scrub reports that it has had to correct additional data or the values listed in `zpool status` have increased further, replace the disk as soon as possible.
Then, if the scrub does not report that it corrected any errors or repaired any data, you can run:
zpool clear zroot
This will reset the counters to zero, to make it easier to notice if they increment again in the future. However, keep an eye on the pool status to see if any errors show up for that disk. If the same disk continues to throw errors, go ahead and plan on replacing the disk out of an abundance of caution.
Issue 2: Eventually disks will fail, so what do you do when that happens?
pool: zroot
state: ONLINE
config:

NAME                     STATE     READ WRITE CKSUM
  zroot                    ONLINE       0     0     0
    mirror-1               ONLINE       0     0     0
      da2p2                ONLINE       0     0     0
      da3p2                ONLINE       0     0     0
    mirror-2               DEGRADED     0     0     0
      2209579256718901607  REMOVED      0     0     0  was /dev/da4p2
      da5p2                ONLINE       0     0     0
In our example above, the disk that was showing errors has now completely failed and been kicked out of the pool. You can either replace that disk or utilize a spare disk if your system happens to have one already installed. See our recent article on ZED, the ZFS Event Daemon for how to automate the replacement of failed disks with spares. To replace the disk manually, assuming /dev/da6p2 is the new replacement disk, run the following commands:
zpool offline 2209579256718901607
zpool replace zroot 2209579256718901607 da6p2
ZFS will automatically start a resilver once the new disk has been added to the pool configuration.
If you are replacing the disk manually, you will need to turn on the drive locate light.
On FreeBSD:
sesutil locate da4 on
For more information about using sesutil on FreeBSD refer to our article: Managing Disk Arrays on FreeBSD/TrueNAS Core.
Depending on the Linux distribution you are on, the method may vary. sg_ses or ledmon are the two main methods:
sg_ses --dsn=1 --set=ident /dev/sg4
sudo ledctl locate={ /dev/sda /dev/sdb }
Issue 3: Needing to restore a snapshot to recover accidentally deleted or overwritten data
There can be many reasons why you would need to roll back to a snapshot. Files may have been corrupted by an application, files may have been removed accidentally, or files may have simply been changed but you need to recover older information which has been overwritten.
To roll your entire dataset back to a snapshot you can run:
zfs rollback pool/dataset@snapshot_name
Keep in mind though that rolling back will destroy data from after the snapshot date, and that any newer snapshots will also need to be destroyed first. If you simply need to recover a few older files you can instead access those files via the hidden .zfs directory, or clone the snapshot to a new dataset.
To copy a single file from a snapshot to your current directory:
cp -p /pool/dataset/.zfs/snasphots/snapshot_name/file1.txt restored.txt
To clone a snapshot, and make it accessible as a normal dataset:
zfs clone pool/dataset@snapshot_name pool/newdataset
Then access the files in /pool/newdataset. Since the clone is of a snapshot, it will not require any additional space unless you later make changes to files in the clone. However, the snapshot cannot be removed as long as the clone is active.
When copying files from a ZFS snapshot, especially large ones like VM images, taking advantage of BRT can provide many significant advantages:
- Instead of reading gigabytes of data from the snapshot and writing it to a new location (which could take minutes or hours), block cloning with BRT makes the copy operation nearly instantaneous. A 100GB VM image can be "copied" in seconds because you're only creating new metadata references, not moving actual data blocks.
- Traditional copying hammers your storage with intensive read/write operations. BRT eliminates this I/O burden entirely for the initial copy, reducing I/O to the drives and freeing up disk bandwidth for other operations. This is especially valuable in environments with multiple concurrent operations.
- When you do modify the cloned VM image, only the changed blocks are written as new data. The unchanged portions continue sharing blocks with the original snapshot. This means if you boot the cloned VM and it only modifies 10% of its disk image, you only use 10% additional storage rather than 100%.
To learn more about BRT, refer to: Accelerating ZFS with copy offloading: BRT
Issue 4: Changing encryption keys
When you create an encrypted dataset, ZFS creates a random secret key and loads that into memory. It asks the user for a passphrase/file, then encrypts the random secret key with the passphrase/file you provide and then saves that encrypted key onto the disk. Any passphrase or file that you use to "unlock" a dataset is actually unlocking the "real key", which is what is used to encrypt the data. This allows you to change the encryption password as needed without having to re-encrypt all of the data. If the passphrase/key is leaked or you fear someone may have had access to your keyfile, you can quickly and easily change it.
Start by ensuring that the dataset is unlocked. It does not need to be mounted, but the old key must already be loaded. If the key is not loaded yet you can load it with the zfs load-key command.
Once the key is loaded you can then use the zfs change-key command to change the password.
For a passphrase:
zfs change-key -o keylocation=prompt -o keyformat=passphrase pool/dataset
For a keyfile:
zfs change-key -o keylocation=file:///usb/key.dat -o keyformat=raw pool/dataset
Be sure to not lose your passphrase or key file. Without, it is not possible to unlock the dataset and read your data. This is by design, allowing you to purposefully destroy the key and be assured that no one will be able to recover the data.
Issue 5: Attempting to replicate an encrypted dataset gives errors.
If you are trying to migrate data to a new server or simply creating an encrypted backup, replication is the best way to transfer data between two ZFS systems. Replicating encrypted datasets requires two things. First, it requires that you are receiving the data into a brand-new dataset, as the encryption key can only be set as the dataset is being created, and during replication the data is sent already encrypted using the same random key as on the source server. You cannot replicate encrypted data into an existing dataset. Secondly, it requires you to use the -w or --raw flag to avoid decrypting the data before transmitting it.
zfs send -w poola/dataseta/dataset_to_replicate@snapashot | ssh host zfs receive poolb/datasetb/dataset_to_replicate
Issue 6: Reparenting Encryption keys
Dealing with encrypted datasets can sometimes get confusing as far as what key goes with which dataset. As described above, the good news is that because the actual key encrypting the data is random and users use a 'wrapping key' generated from their password; you can sync all your 'wrapping keys' together if you desire. While there are reasons to encrypt datasets with different wrapping keys, for a small business or a single person it can be advantageous to be able to unlock all your datasets with a single password or key file.
Using the example above, let's consider that poolb/datasetb is an encrypted dataset on its own, when we replicate dataset_to_replicate to it, we will have two encrypted datasets:
poolb/datasetb
poolb/datasetb/dataset_to_replicate
Both of these will have separate "encryption roots". If you run zfs get encryptionroot you will see that each is listed as its own encryption root. However, if we want to be able to unlock both datasets with the same wrapping key we would run:
zfs change-key -li poolb/datasetb/dataset_to_replicate
This will inherit the wrapping key for poolb/datasetb/dataset_to_replicate from poolb/datasetb allowing us to unlock both with the same passphrase. Be aware that if you rename datasets to be able to inherit from a different parent, it may disrupt automated incremental replication.
Conclusion
We have highlighted some of the most common scenarios that operators tend to run into and provided some guidance on how to understand the resolve the issues. If you find yourself responsible for an important storage array, get the peace of mind knowing that you have access to the expertise you need, when you need it, with the Klara ZFS Support Subscription.