


In Basics of ZFS Snapshot Management, we demonstrated how snapshots and clones can be used to access data from a given point in time. In this article, we’ll learn how ZFS boot environments (BEs) are used to boot the operating system itself into a previous point in time.
A ZFS boot environment is a bootable clone of the datasets needed to boot the operating system. Creating a BE before performing an upgrade provides a low-cost safeguard: if there is a problem with the update, the system can be rebooted back to the point in time before the upgrade.
For users looking for an alternative boot management solution, we recommend checking out our article on Introduction to ZFSBootMenu. It provides a simple way to manage boot environments with a Linux-based bootloader and ZFS support.
The FreeBSD boot loader was rewritten for 12.0 to add BE support. Additionally, the default ZFS layout in the FreeBSD installer understands BEs.
This article demonstrates how to use the bectl utility to manage BEs and provides examples on how to update packages, apply security patches, and upgrade the operating system using BEs.
Using bectl(8)
Prior to FreeBSD 12.0, the sysutils/beadm port was available for managing BEs. This shell script was rewritten in C and included with the operating system as bectl beginning withFreeBSD 12.0. If you’ve used beadm in the past, the options are the same in bectl. bectl adds a few more options (such as jail support) which we won’t cover today.
This command lists available BEs. Here is an example from a freshly installed 12.2 system:
bectl list
BE 		Active 	Mountpoint 	Space 	Created
default 	NR 		/ 			906M 		2021-06-10 04:29
By default, there is one BE named default. The N in the Active column indicates that this BE is active now; in other words, this is the currently booted BE. The R means that this BE is automatically selected on reboot, unless the boot process is interrupted.
The create option creates a new BE, which is a clone of the currently booted BE:
bectl create test
bectl list
BE 		Active 	Mountpoint 	Space 	Created
default 	NR 		/ 			906M 		2021-06-10 04:29
test 		- 		- 			8K 		2021-06-10 05:11
The test BE has no Active letters as it is not the currently booted BE and it isn’t configured to be the default on next boot.
If I reboot this system, the boot menu now has a new 8. Boot Environments entry:
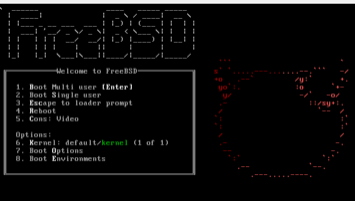
Press 8 or e to enter the BE sub-menu:
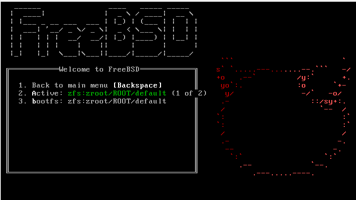
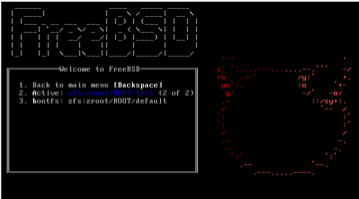
Press 2 as often as needed to toggle through the list of BEs. Once you find the one you want to boot into, press a or enterto boot into the selected BE. Here I’ve selected the test BE:
Once booted, the listing changes to:
bectl list
BE 		Active 	Mountpoint 	Space 	Created
default 	R 		/ 			906M 		2021-06-10 04:29
test 		N 		- 			404K 		2021-06-10 05:11
Since the R is still on the default BE, the system will continue to boot into the default BE unless I interrupt the boot menu. To permanently set the test BE as the new default, use the activate switch:
bectl activate test
Successfully activated boot environment test
bectl list
BE 		Active 	Mountpoint 	Space 	Created
default 	- 		- 			424K 		2021-06-10 04:29
test 		NR 		/ 			906M 		2021-06-10 05:11
Did you know?
Getting your ZFS infrastructure up to date has never been easier!
Our team provides consistent, expert advice tailored to your business.
Example: Updating Packages in BE
In this example, I have a 12.2 laptop with a lot of packages installed and it’s been a while since I’ve updated them. I’ll start by creating a BE with a useful name:
bectl create pkg_update_`date +%y%m%d`If I mount that BE and perform the package update within that BE, I can reboot into the new BE to test the updated packages. To mount the BE, specify its name:
bectl list | grep pkg
pkg_update_210610 	-	 -	 496K	 	2021-06-10 05:11
bectl mount pkg_update_210610
Successfully mounted pkg_update_210610 at /tmp/be_mount.EFae
Make note of the mount point (tmp/be_mount.EFae) and specify it to the pkg command to update the repos and perform the pkg upgrade:
pkg -r /tmp/be_mount.EFae update -f
Updating FreeBSD repository catalogue...
FreeBSD repository update completed. 30504 packages processed.
All repositories are up to date.

pkg -r /tmp/be_mount.EFae  upgrade
Checking for upgrades (626 candidates): 100%
<snip>
Number of packages to be installed: 44
Number of packages to be upgraded: 394
Number of packages to be reinstalled: 37
The process will require 179 MiB more space.
1 GiB to be downloaded.
Proceed with this action? [y/N]: y
Once the upgrade is complete, boot into that BE to test the packages. Once you’re satisfied everything is working as expected, you can activate that BE.
Example: Deploying a Security Patch
The same process can be used to patch the operating system. In this example, I’ll update the default FreeBSD 12.2 installation to the latest patch level. Start by creating a BE, mounting it, and noting the name of the mount point:
bectl create security_update_`date +%y%m%d`
bectl list |grep security
security_update_210610 	-	 -	 8K	 2021-06-10 06:15
bectl mount security_update_210610
Successfully mounted security_update_210610 at /tmp/be_mount.7pMM
Next, ensure that freebsd-update doesn’t use its default database in the currently booted BE by removing that directory:
rm -Rf /var/db/freebsd-updateRun the freebsd-update utility and specify the BE mount point as the basedir (-b) and the BE’s database as the workdir (-d). First, fetch the updates:
freebsd-update -b /tmp/be_mount.7pMM -d /tmp/be_mount.7pMM/var/db/freebsd-update fetch
<output snipped>
The following files will be removed as part of updating to
12.2-RELEASE-p8:
<SNIP> (use page down to read through and q to quit)
Next, repeat that command with install:
freebsd-update -b /tmp/be_mount.7pMM -d /tmp/be_mount.7pMM/var/db/freebsd-update install
<output snipped>
done.
Before rebooting into the patched BE, let’s verify the version of the currently booted BE:
freebsd-version -u
12.2-RELEASE
Repeat that version check after rebooting into the security_update_210610 BE:
freebsd-version -u
12.2-RELEASE-p8
Once you’ve tested the BE, you can activate it.
Did you know?
Want to learn more about ZFS? We consistently write about the awesome powers of OpenZFS in our article series.
Example: Testing an OS Upgrade
For this example, I’ll test updating the patched 12.2-RELEASE-p8 BE to 13.0. Again, create a new BE and mount it:
bectl create 13.0
bectl mount 13.0
Successfully mounted 13.0 at /tmp/be_mount.JO5Y
Specify the release version (-r 13.0-RELEASE) to upgrade toin the freebsd-update command:
freebsd-update -b /tmp/be_mount.JO5Y -d /tmp/be_mount.JO5Y/var/db/freebsd-update -r 13.0-RELEASE upgrade
<output snipped)
The following file will be removed, as it no longer exists in
FreeBSD 13.0-RELEASE: /etc/motd
Does this look reasonable (y/n)? y
<snip> (page down through list of files and q to quit)
To install the downloaded upgrades, run "/usr/sbin/freebsd-update install".
Next, repeat the command, this time with install:
freebsd-update -b /tmp/be_mount.JO5Y -d /tmp/be_mount.JO5Y/var/db/freebsd-update -r 13.0-RELEASE install
Installing updates...
Kernel updates have been installed. Please reboot and run
"/usr/sbin/freebsd-update install" again to finish installing updates.
Using the ZFS bootonce feature we developed at Klara, you can instruct the system to boot a different boot environment, one time only, with the -t (temporary) flag.
bectl activate -t 13.0Reboot and the 13.0 BE will be loaded, and the temporary flag will be cleared. Since you are now rebooted into that BE, you don’t have to mount it and can just issue the install command to complete the installation process:
freebsd-update installOnce you are finished testing the upgrade, you can activate the BE.
bectl activate 13.0If the upgrade isn’t working, or you don’t activate the 13.0 BE, rebooting will return to the previous default BE.
If Something Goes Wrong
Most OS upgrades “just work”. Occasionally you will hit a gotcha that requires configuration file edits after booting into the new OS version. Once these are resolved, you can activate the BE.
Sometimes you get the dreaded mountroot> prompt that halts the OS boot process. In this case, simply boot into a good BE, then mount the problematic BE, noting its mount point. As you research which update gotcha bit you, you can make any modifications within the mount point. For example, if the BE mount point is /tmp/be_mount.ON3E and you need to edit the BE’s fstab file, make your edits to /tmp/be_mount.ON3E/etc/fstab


