Improve the way you make use of ZFS in your company.
Did you know you can rely on Klara engineers for anything from a ZFS performance audit to developing new ZFS features to ultimately deploying an entire storage system on ZFS?
ZFS Support ZFS DevelopmentAdditional Articles
Here are more interesting articles on Embedded, ZFS, and FreeBSD that you may find useful:
- OpenZFS Storage Best Practices and Use Cases – Part 1: Snapshots and Backups
- FreeBSD vs. Linux – Which Operating System to use for OpenZFS
- The FreeBSD Boot Process
- Managing Boot Environments
Today, we’re going to take a look at ZFSBootMenu, also known as ZBM. It’s a lovely tool that gives Linux distributions access to OpenZFS Boot Environments.
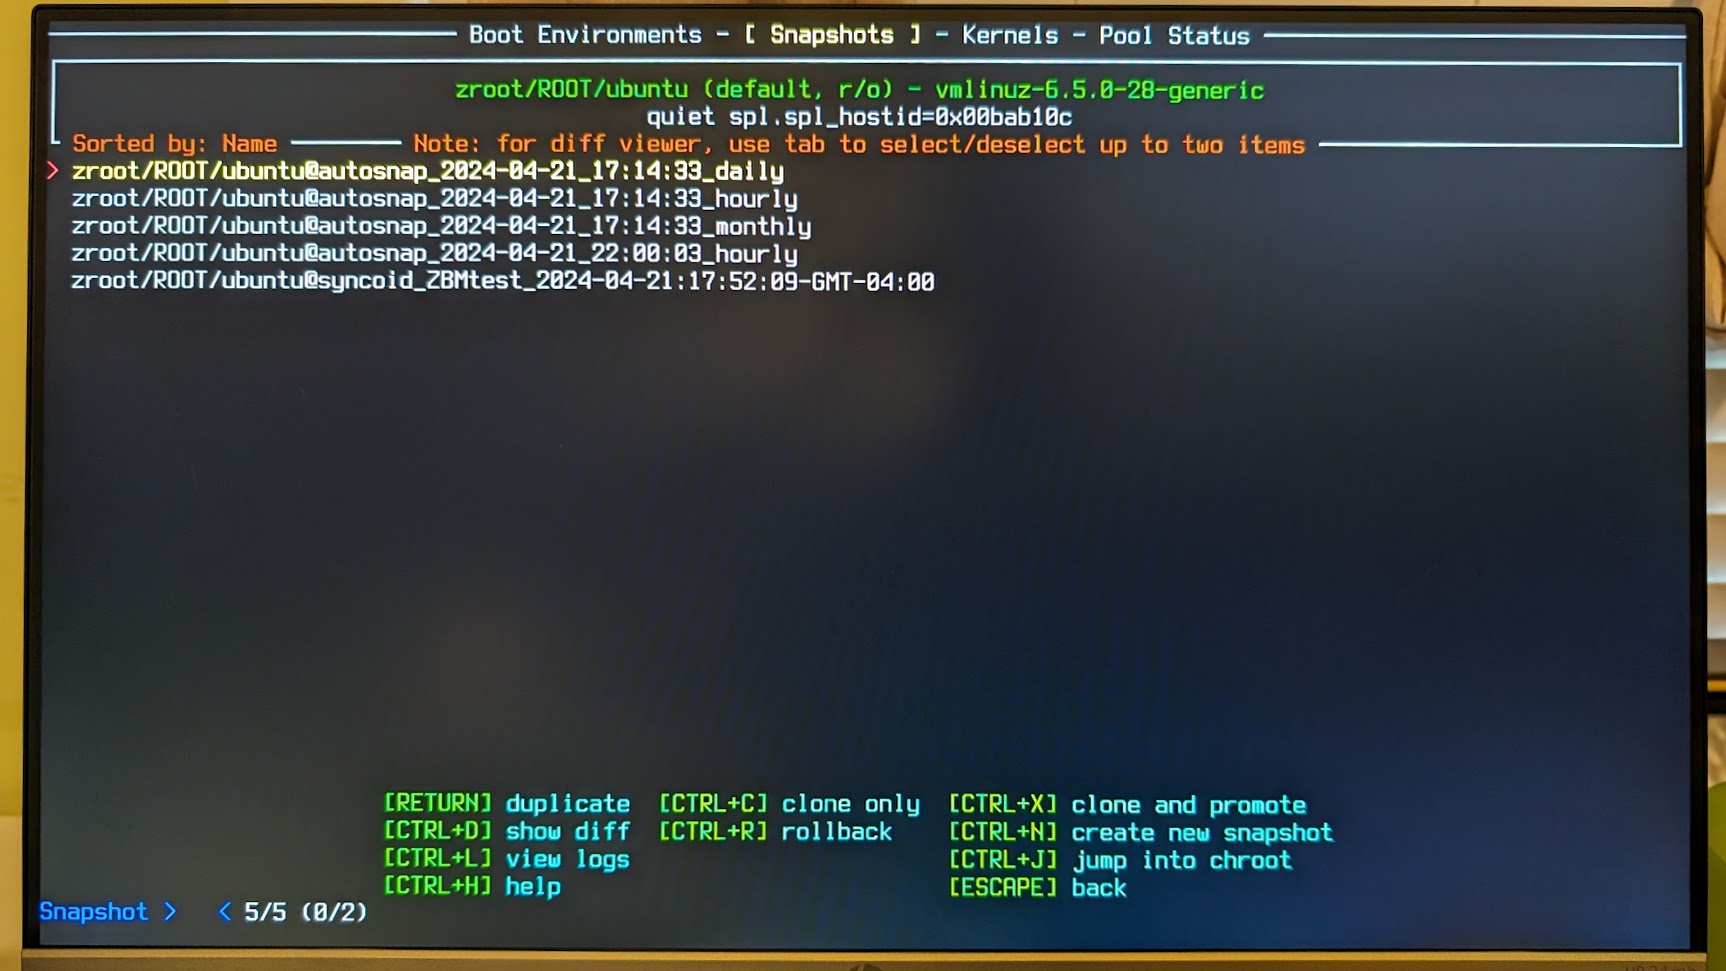
In a nutshell, an OpenZFS Boot Environment gives administrators handy tools to boot from an OpenZFS root. You can also choose which dataset, snapshot, or copy to boot from, all before the OS loads.
FreeBSD users have had access to the operating system's built-in ZFS boot environment for over a decade. More impressively, they don’t even need to install additional software to use it. Things aren’t quite that simple in Linux-land yet. With a bit of extra work during OS installation, ZFSBootMenu can provide useful functionality. It can continue to offer this functionality for years to come.
The ZFSBootMenu project provides excellent installation documentation for a wide selection of distributions, including Ubuntu, Debian, Arch, and Void Linux. For the most part, we’re not going to rehash those step-by-step instructions. We’re more interested in showing you what you can do with ZFSBootMenu after it’s up and running. However, the installation can admittedly be daunting for some folks, so we will point out a few common papercuts.
Speaking of those papercuts, we’re going to address one right off the bat. Although you don’t need to boot ZBM from a USB thumbdrive in day-to-day use, we strongly recommend creating a bootable thumbdrive for it.
Having a portable boot drive on hand can save you a lot of time if you need to troubleshoot. It can be the difference between wasted hours on unnecessary OS reinstallation versus wasted minutes on fixing some minor step in UEFI configuration!
First Step – Create a Portable Boot Drive!
If there’s one lesson we wish we’d learned prior to taking our own first steps with ZFSBootMenu, this is it: make yourself a bootable thumb drive. Do so before you even try to install an actual operating system.
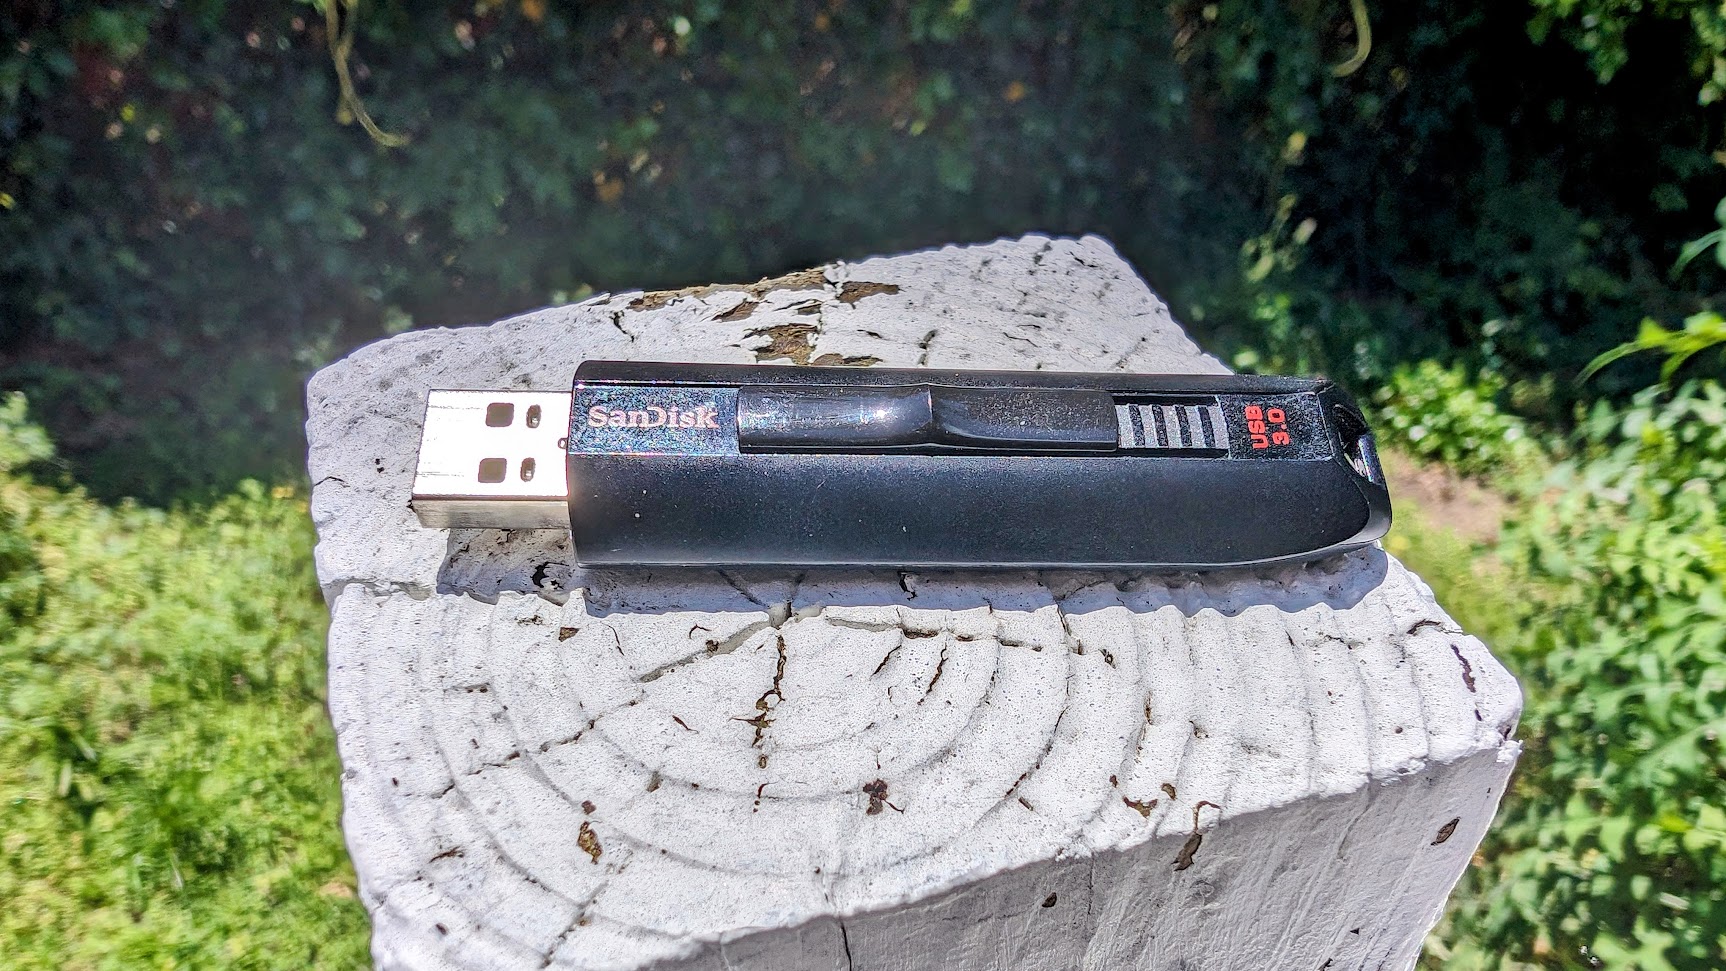
Preparing Your Bootable ZBM Thumb Drive
To be clear, we’re not talking about the thumb drive you pull live sessions or install your distribution from. Instead, we’re talking about a separate thumb drive for ZFSBootMenu itself. A portable ZBM drive will allow you to boot from any ZBM-enabled Linux installation it can find. This is useful for system rescues, testing, and just plain confirming that your machine’s UEFI firmware isn’t being a jerk.
In our experience, UEFI firmware is often extremely fiddly and difficult to manage. It can leave your motherboard refusing to boot a perfectly good operating system. Unfortunately, the kind of very hands-on operation system installation demanded when you swap in a different boot manager is also a bit fiddly.
Luckily, creating a ZBM portable boot drive is quick and easy. Unlike manual Linux installations, it's also simple to verify that it works. So that’s how we’re going to begin—by first creating, then testing a ZBM portable boot drive.
Formatting the Thumb Drive for ZBM Bootloader
After inserting your thumb drive, first verify its device name. Then, check and unmount for any automatically-mounted filesystems on it:
root@elden:~# dmesg | grep Attached | tail –n1
[6473097.915717] sd 8:0:0:0: [sdx] Attached SCSI removable disk

root@elden:~# mount | grep sdx
/dev/sdx1 on /media/jrs/VOID_LIVE type iso9660

root@elden:~# umount /dev/sdx1
With that done, it’s time to destroy existing partitions on the thumbdrive. You will then create and format a new partition for the portable ZBM bootloader. Keep in mind, this is a destructive operation.
root@elden:~# wipefs –a /dev/sdx
/dev/sda: 5 bytes were erased at offset 0x00008001 (iso9660): 43 44 30 30 31
/dev/sda: 2 bytes were erased at offset 0x000001fe (dos): 55 aa
/dev/sda: 8 bytes were erased at offset 0x00000200 (gpt): 45 46 49 20 50 41 52 54
/dev/sda: 8 bytes were erased at offset 0x74ffffe00 (gpt): 45 46 49 20 50 41 52 54
/dev/sda: calling ioctl to re-read partition table: Success

root@elden:~# sgdisk --zap-all /dev/sdx
Creating new GPT entries in memory.
GPT data structures destroyed! You may now partition the disk using fdisk or other utilities.

root@elden:~# sgdisk -n "1:1m:+512m" -t "1:ef00" "/dev/sdx"
Creating new GPT entries in memory.
The operation has completed successfully.

root@elden:~# mkfs.vfat -F32 /dev/sda1
mkfs.fat 4.2 (2021-01-31)
Verifying the ZBM Boot Drive and Performing a Test Boot
Now that we’ve set up a 512MiB FAT32 filesystem on partition 1, with partition type EF00, it’s time to drop the ZBM bootloader onto it. This is simple, but it’s very exacting—many motherboards will silently refuse to detect a UEFI bootable partition at all if it has any extra files in it, even if the correct files are there.
We recommend being surgical about this. There should be only one file on the entire filesystem, in exactly the folder structure specified, with zero changes to folder names, file names, or additional files present.
root@elden:~# mkdir –p /mnt/ZBMdrive
root@elden:~# mount /dev/sdx1 /mnt/ZBMdrive
root@elden:~# mkdir –p /mnt/ZBMdrive/EFI/BOOT
root@elden:~# wget –O /mnt/ZBMdrive/EFI/BOOT/BOOTX64.EFI https://get.zfsbootmenu.org/efi/recovery
With that done, you should have two folders and one file total. Verify the correct file and folder structure, and unmount your drive:
root@elden:~# find /mnt/ZBMdrive
/mnt/ZBMdrive
/mnt/ZBMdrive/EFI
/mnt/ZBMdrive/EFI/BOOT
/mnt/ZBMdrive/EFI/BOOT/BOOTX64.EFI

root@elden:~# umount /mnt/ZBMdrive
Now, it’s time to perform a test boot. Pop the thumbdrive you just created into the system you plan to boot ZBM with. Then, reboot and make sure your motherboard picks the thumb drive as its first boot option. You should see the following screen:
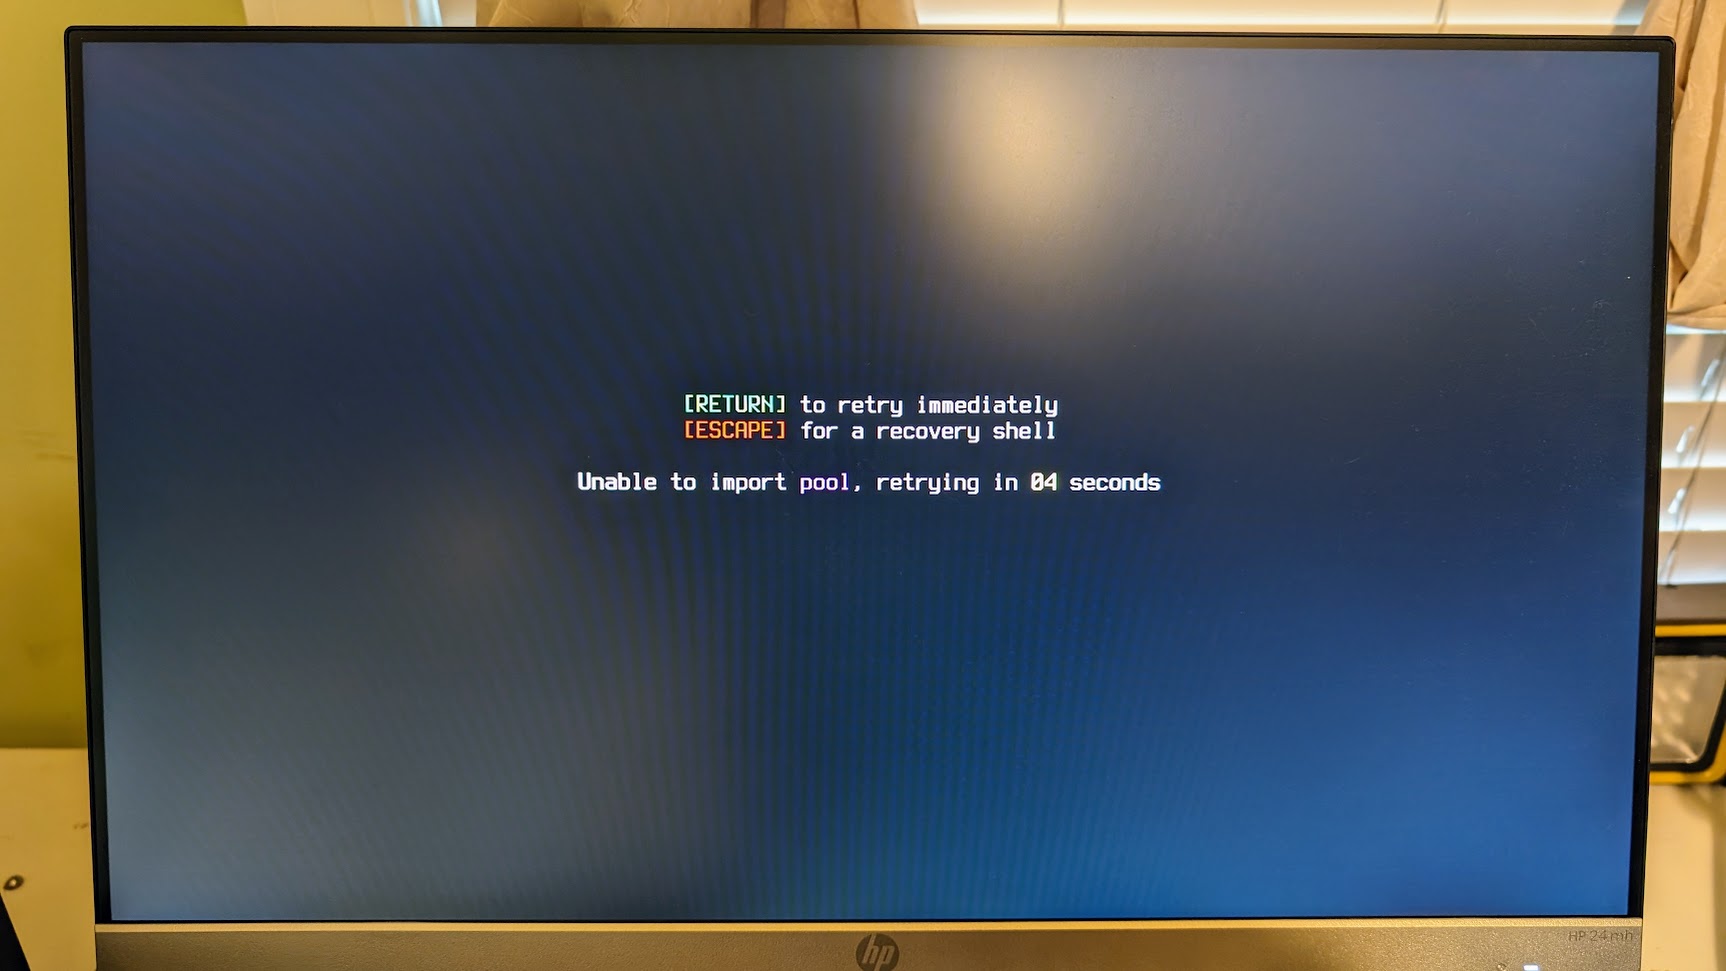
You’ll need to pause and address the issue if you don’t see a dialog like this. Should your motherboard fail to recognize the boot thumb drive, fix that before moving on.
Installing Ubuntu 23.10
Like we said up top, we’re not going to walk you step by step through the entire experience of installing your preferred Linux distribution. For one thing, that would end up being the entire article. More importantly, it wouldn’t leave us any time to show you how to use ZBM itself!
| For a deeper understanding of deploying ZFS on Linux, check out our guide to ZFS on Linux.
The distribution we chose to install on our test system is Ubuntu 23.10, aka Mantic Minotaur. To install it, we simply created an Ubuntu installer thumbdrive. Note: this is not the same one we’ve got our portable ZBM bootloader on! Then we followed the ZBM project’s instructions for Ubuntu 22.04, simply substituting the word “mantic” anywhere the word “jammy” came up.
Pain Points to Watch Out For
- When we wrote this article, a breaking bug with the 6.8 kernel and the version of the OpenZFS libraries made installing Ubuntu Noble via debootstrap impossible. Thankfully, that bug has since been resolved.
- Beware of missing crucial packages. The debootstrap manual installation you’re going to perform will leave you with an EXTREMELY minimal OS, similar to Ubuntu Server Minimal. We strongly recommend apt install isc-dhcp-client bind9-dnsutils nano while you’re chrooted into the new installation. And, do it before the reboot, otherwise you may find yourself with no networking, no tools to diagnose your lack of networking with, and no comfortable editor to fix things with either.
- You also won’t get a desktop out of the debootstrap install. It doesn’t matter whether you do that part during the installation or after the first reboot, but apt install ubuntu-desktop will pull in the full Gnome3-based desktop interface.
Apart from that, if you follow the ZBM project’s installation instructions carefully, you should have a fairly easy time of it. If you’d like to install a different version of Ubuntu than the instructions specify, simply change the project name in the debootstrap step. For example, we ran the command debootstrap mantic /mnt rather than the specified debootstrap jammy /mnt.
First-Boot Troubleshooting Tips
In the case your computer refuses to find the ZFSBootMenu partition you created on your drive, don’t panic. Even if it refuses to actually boot from it, even when you select it manually, there’s no need to worry. That’s why you created and tested a ZBM thumb drive!
If your thumb drive boots the system successfully and the partition you created on your drive won’t, check your steps. Ensure you have performed the efibootmgr steps from the ZFSBootMenu installation instructions. They're mandatory for most motherboards we’ve tested.
Even after completing the efibootmgr steps, if your system still fails to boot, your motherboard’s UEFI firmware might be particularly picky about the folder structure. In this case, try recreating the on-disk boot partition with the same EFI\BOOT\BOOTX64.EFI structure used for your thumb drive. Then, register it again with efibootmgr.
If all else fails, you could make booting from the thumb drive your standard practice. While it does tie up a USB port, the thumbdrive experiences minimal wear and tear.
Managing Boot Environments
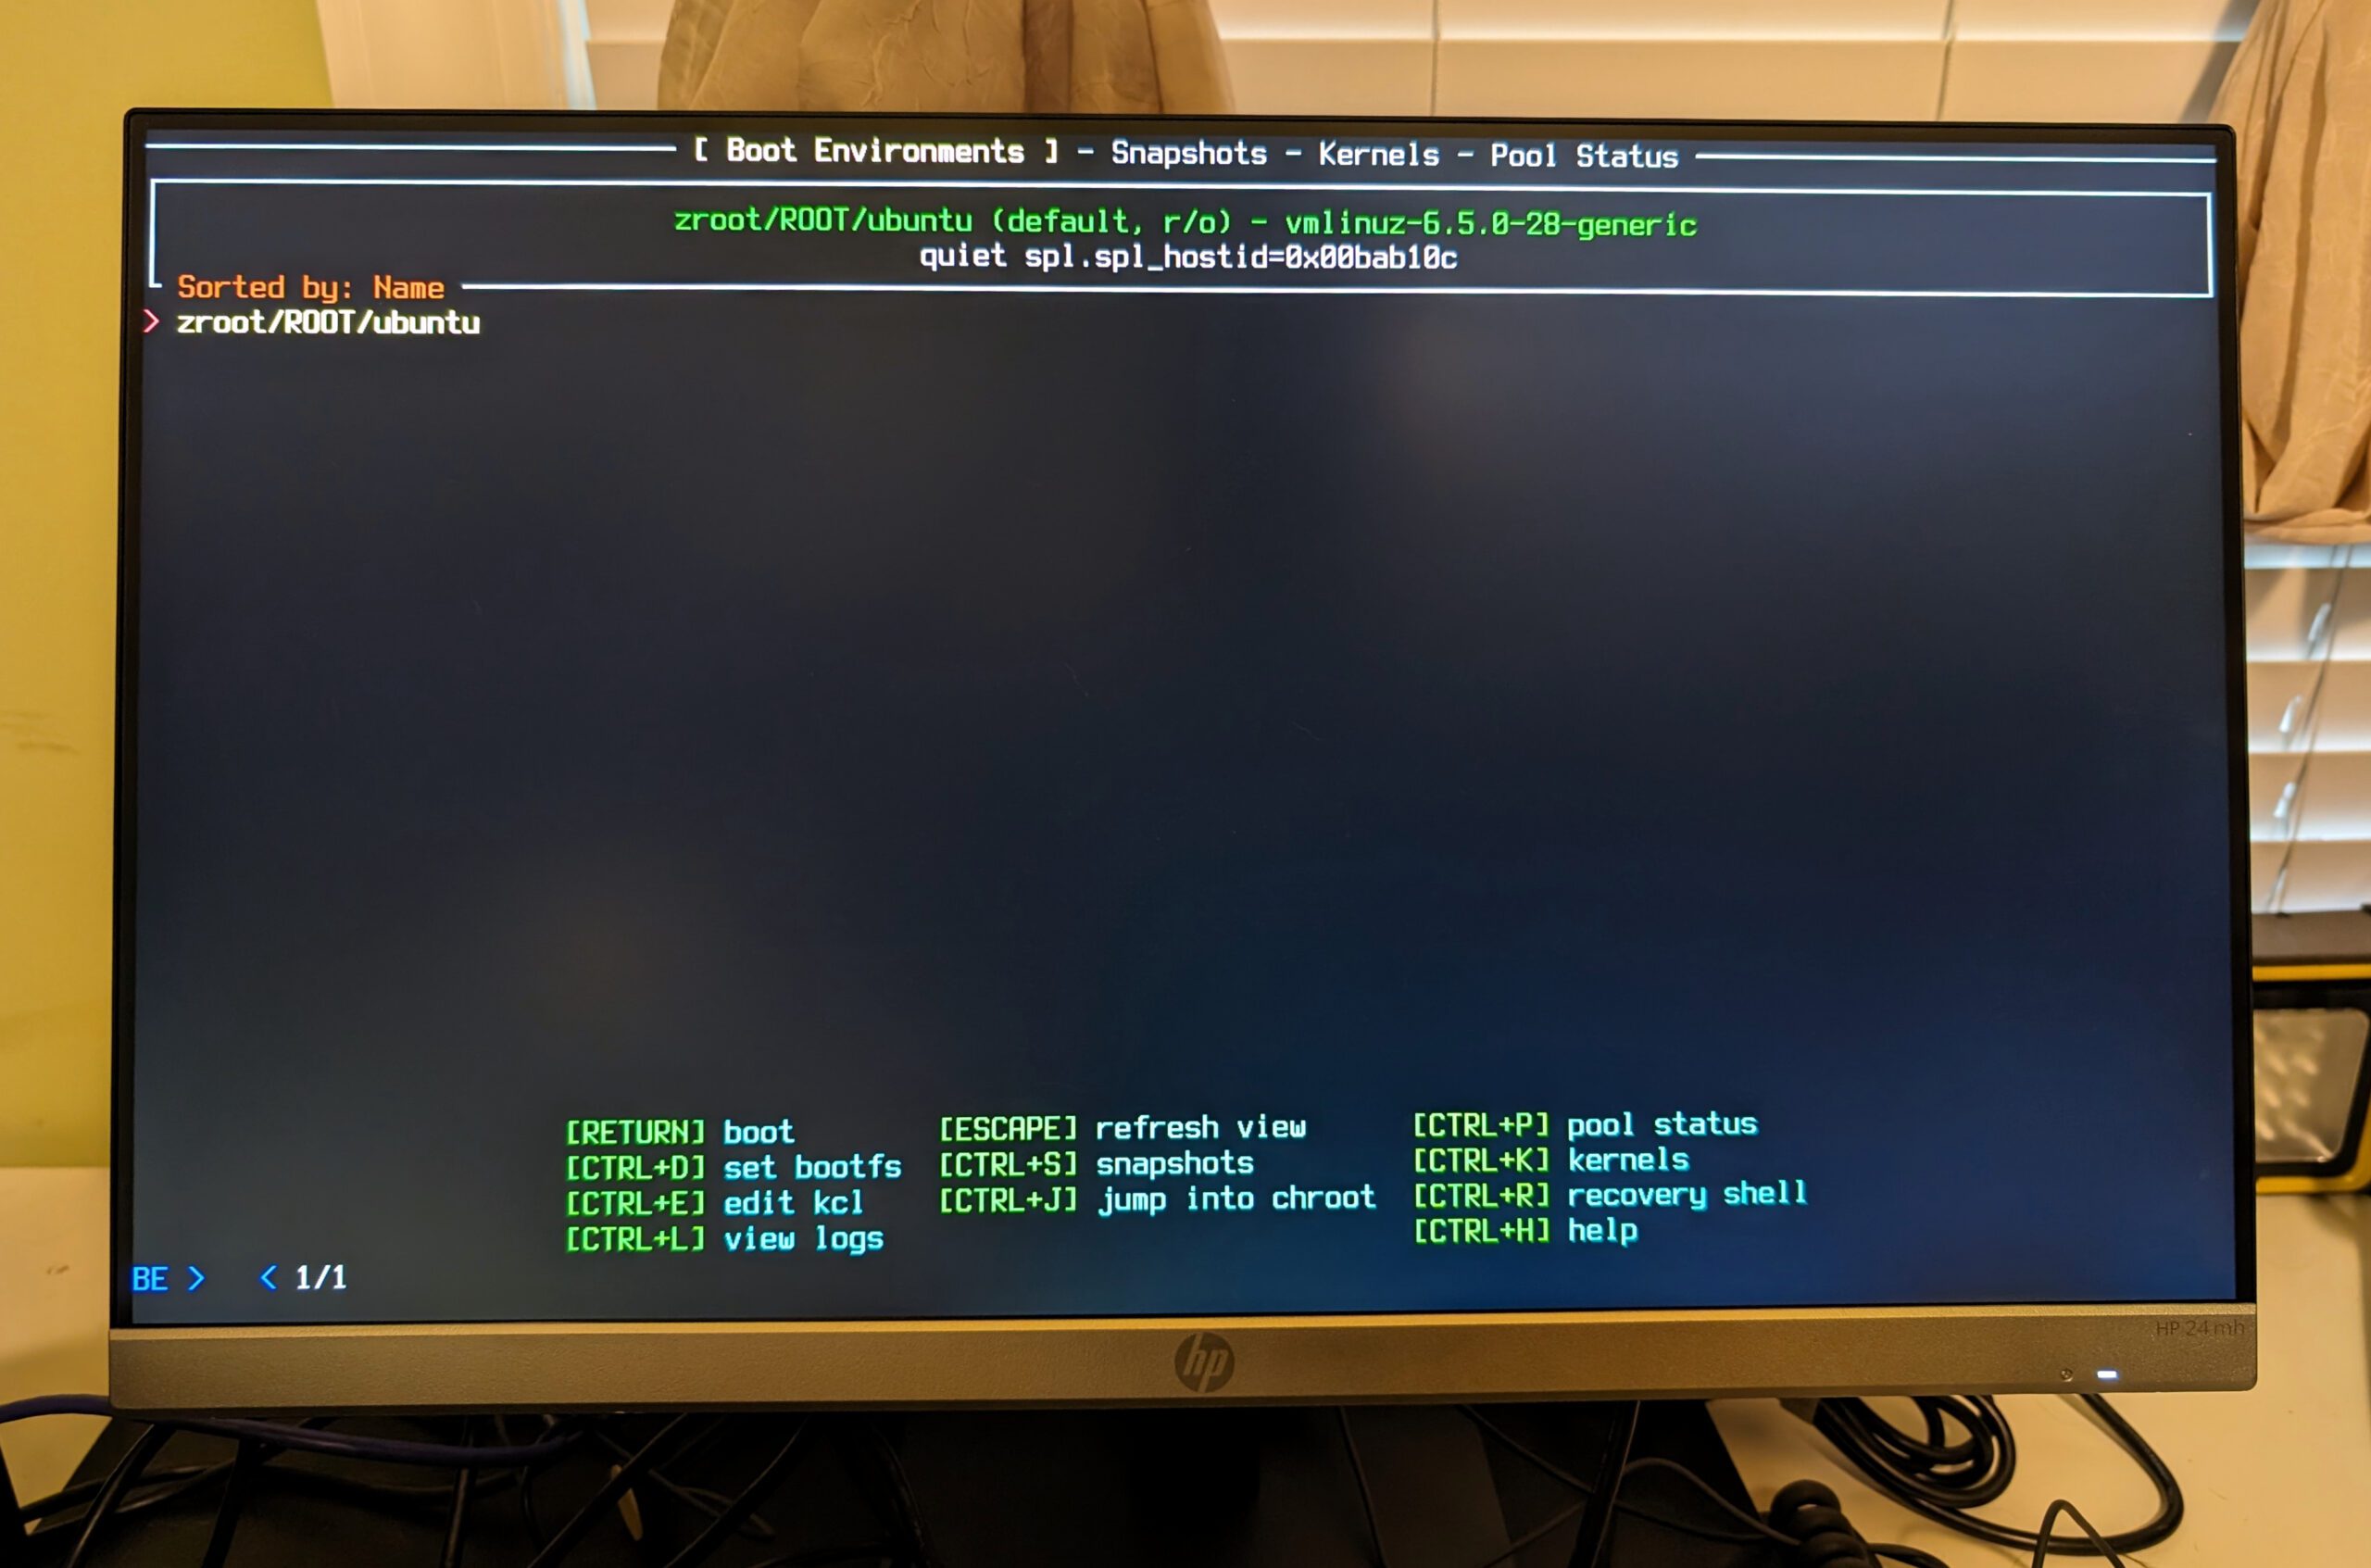
Once we’ve successfully installed our operating system, we can start putting ZFSBootMenu itself through its paces. Above, we can see the default view on our first successful boot—it shows the location of any ZBM-bootable operating systems found.
Configuring and Accessing ZFSBootMenu Snapshots
However, things get more interesting once we move in and set things up properly. After installing and configuring Sanoid (which begins automatically taking and managing snapshots for us) we can reboot again. Press CTRL+S to get into ZBM’s Snapshots view:
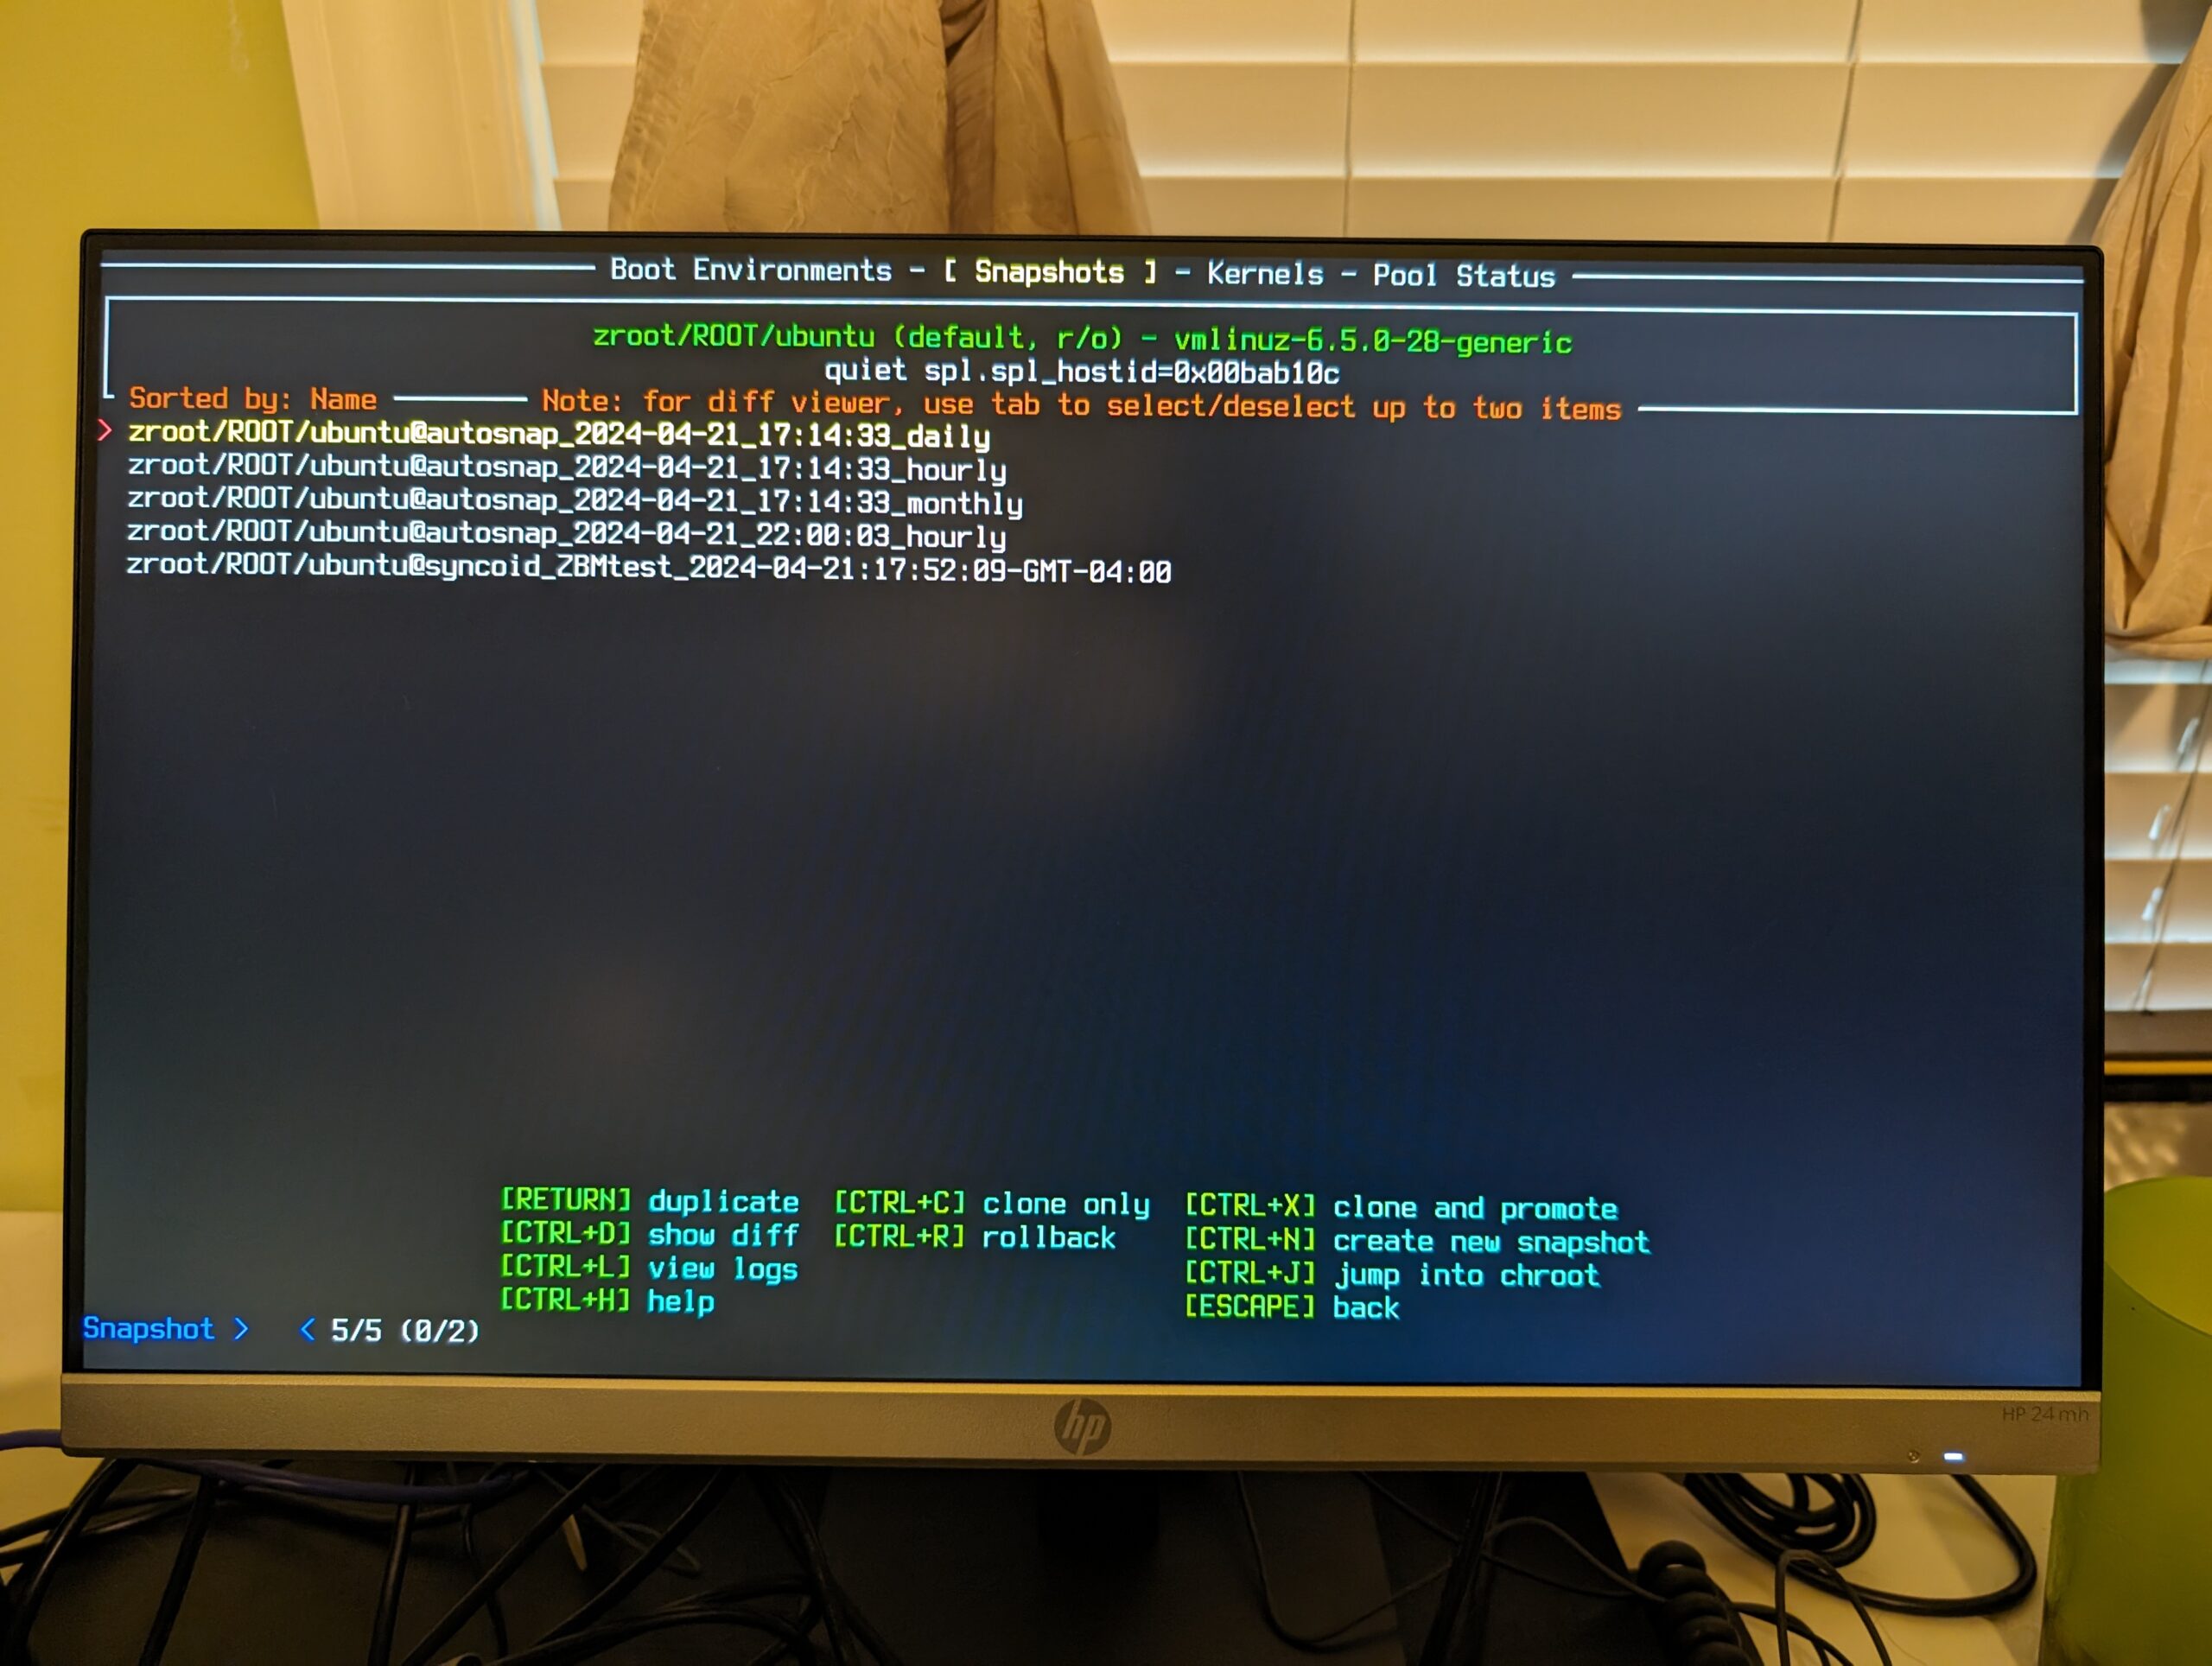
Above, we can see the first automatic hourly, daily, and monthly snapshots created by Sanoid. You'll also notice a sync snapshot syncoid left behind when I backed up my new installation by replicating it to another system.
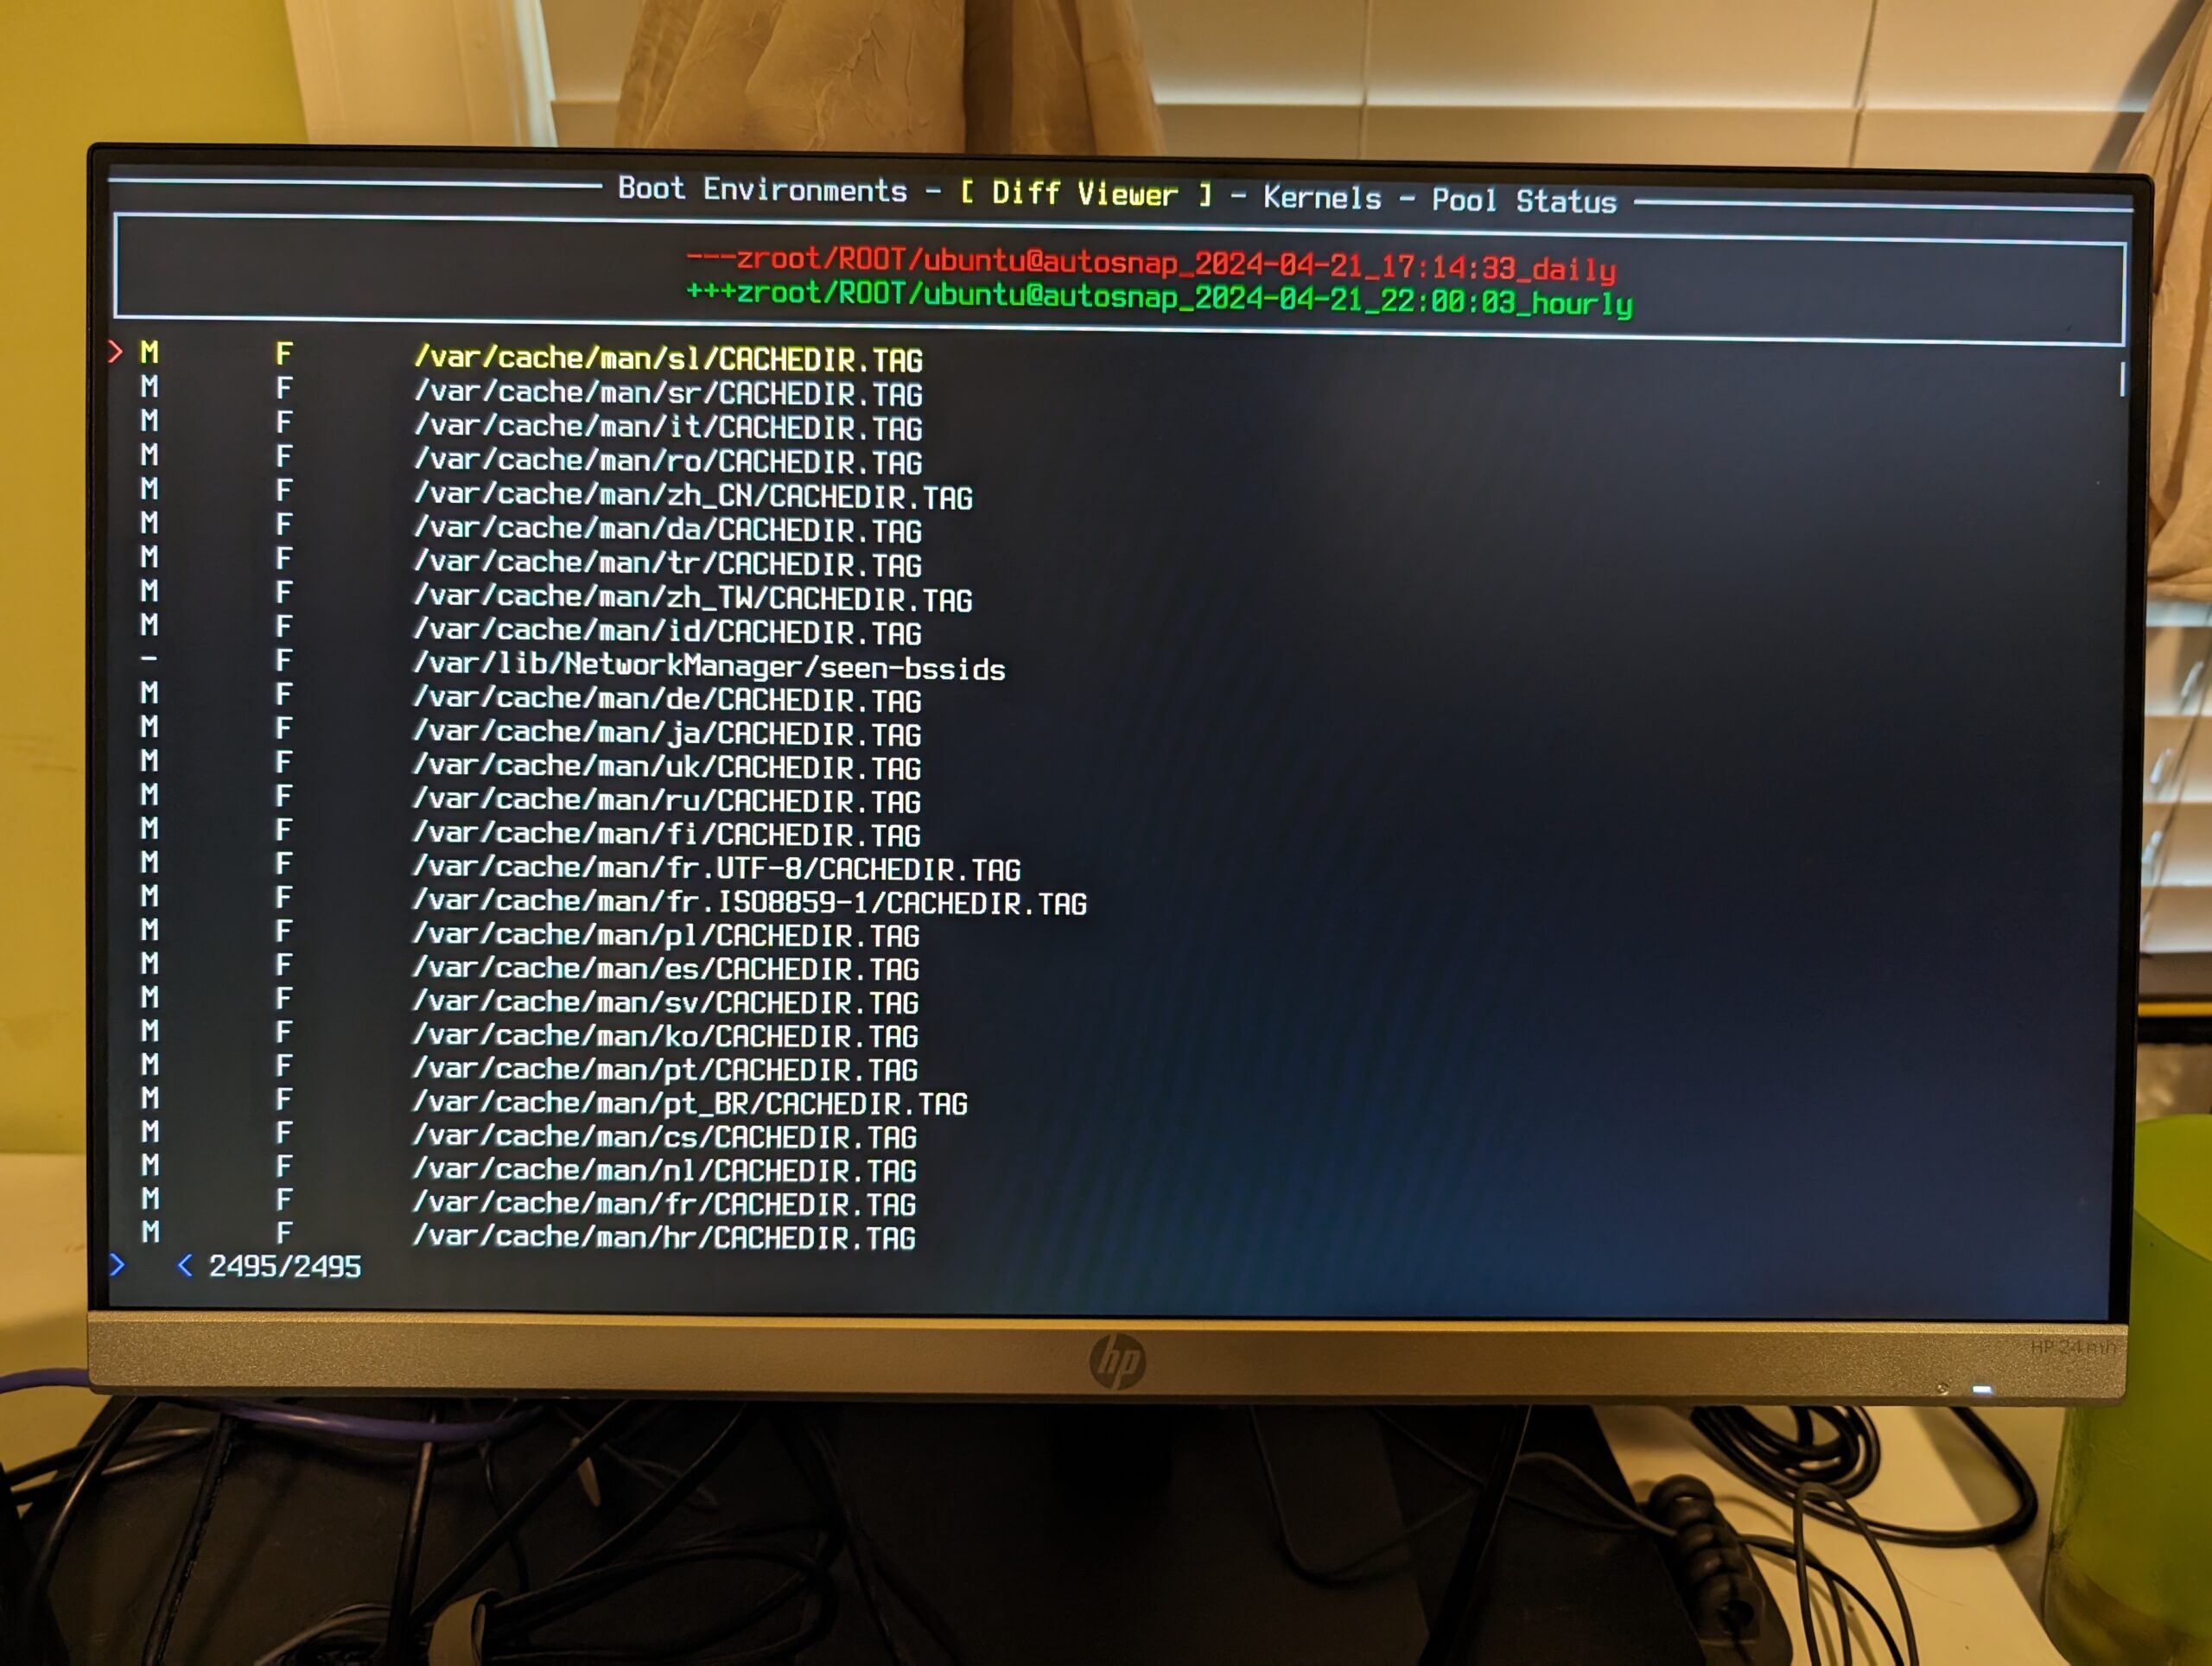
From this simple menu, we have several interesting options. We can roll back to a snapshot, create a clone of it, or even duplicate it entirely, block-for-block via ZFS replication. We can also jump into it in a chroot, or use a simple diff tool built into ZBM itself to look for changed files!
Understanding Snapshot Operations: Rollbacks, Clones, and Duplicates
For the most part, this is pretty straightforward, but let’s talk about the differences in practice between rollbacks, clones, and duplicates:
- Rolling back a snapshot is a near-instantaneous, destructive operation. The dataset itself transforms back to its precise condition at the point in time the snapshot was taken. All snapshots newer than the rollback are destroyed. There’s no going back from this!
- Cloning a snapshot results in a new, writable dataset. It is a 1:1 copy of the original dataset, at the point in time the snapshot was taken. This is a near-instantaneous and non-destructive option. But, it creates a permanent dependency between the cloned dataset and its parent snapshot, which can never be destroyed.
- Promoting a cloned snapshot means changing the directionality of the dependency between the clone and its parent. The clone becomes the primary version of the dataset, and the original dataset (and any snapshots newer than the clone’s parent) become permanently dependent on the clone. This allows you to destroy the original dataset and keep the clone, but still won’t allow you to keep the original if you destroy their common snapshot.
- Duplicating a snapshot uses OpenZFS replication to create an exact, 1:1 copy of the original dataset at the point in time the snapshot was taken. This is a non-destructive action, but may take significant time to complete, since it’s got to copy every block of data from the original in its entirety.
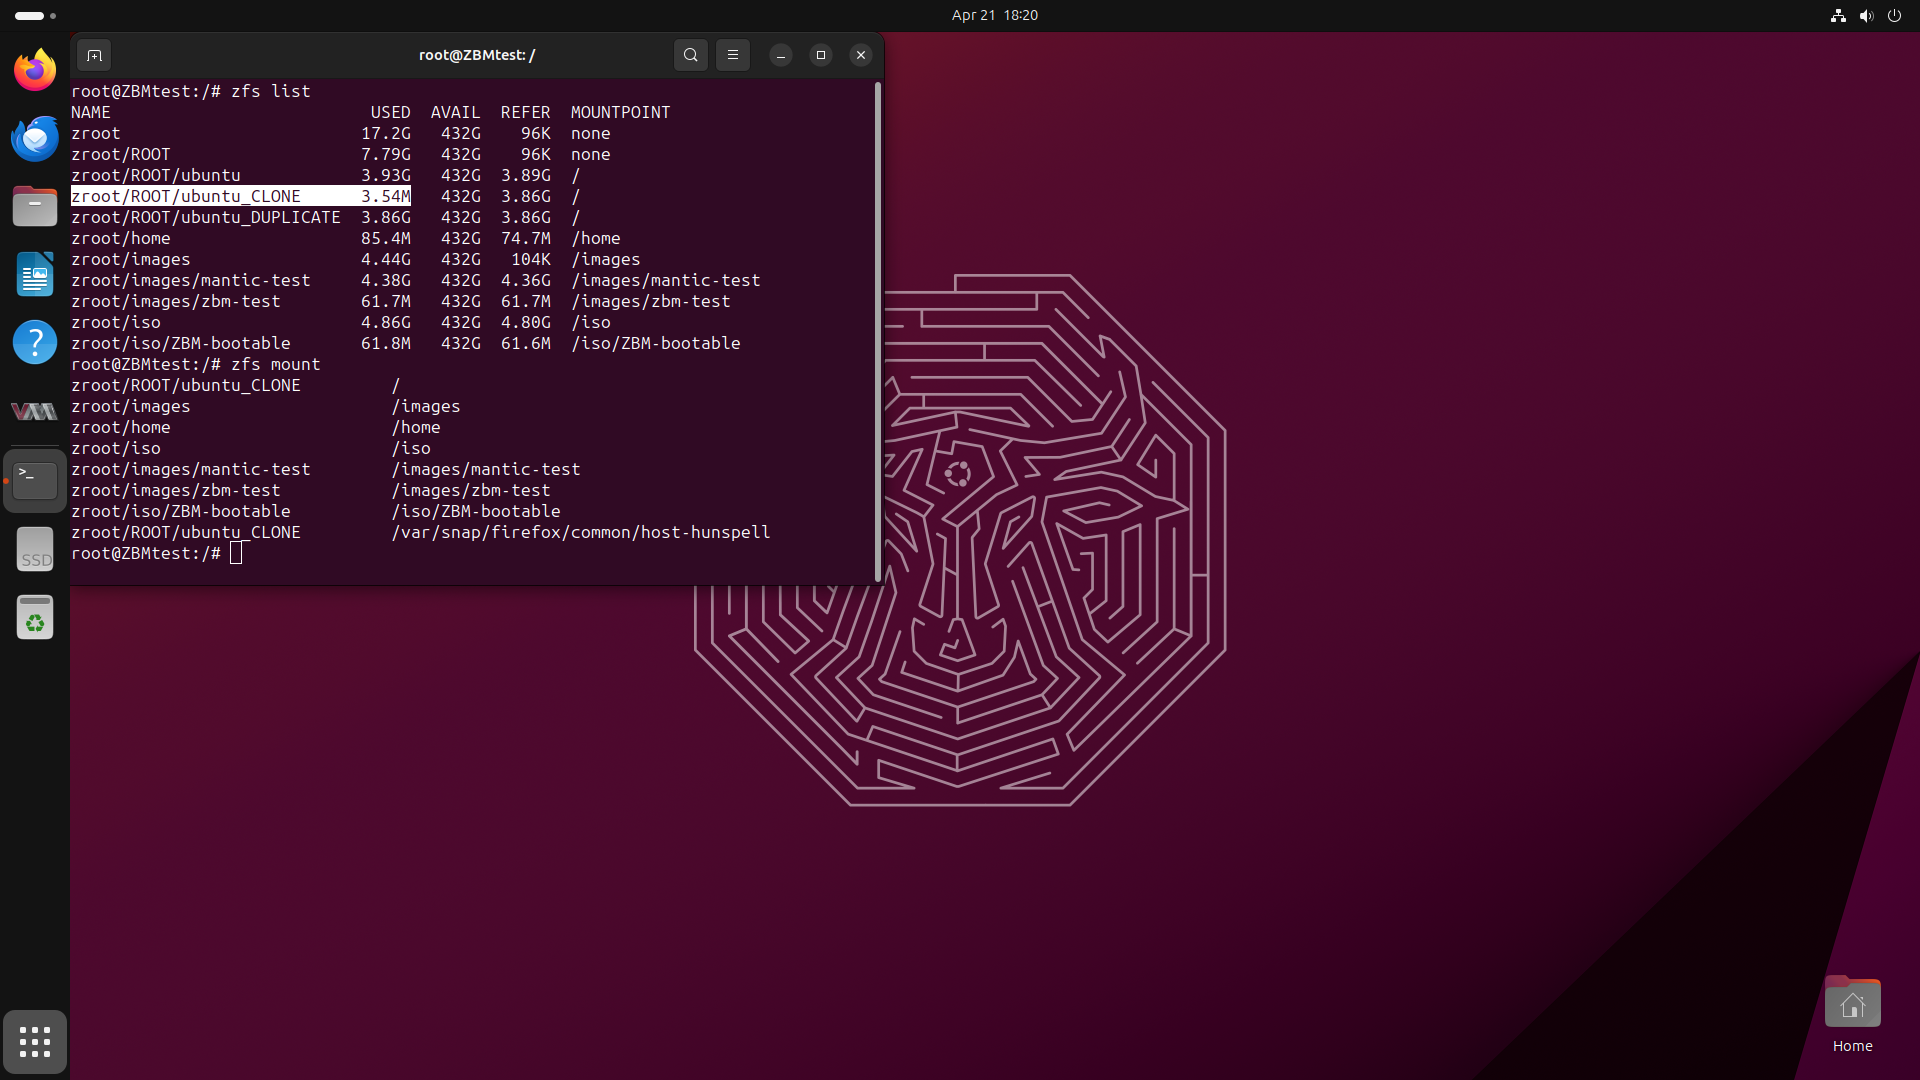
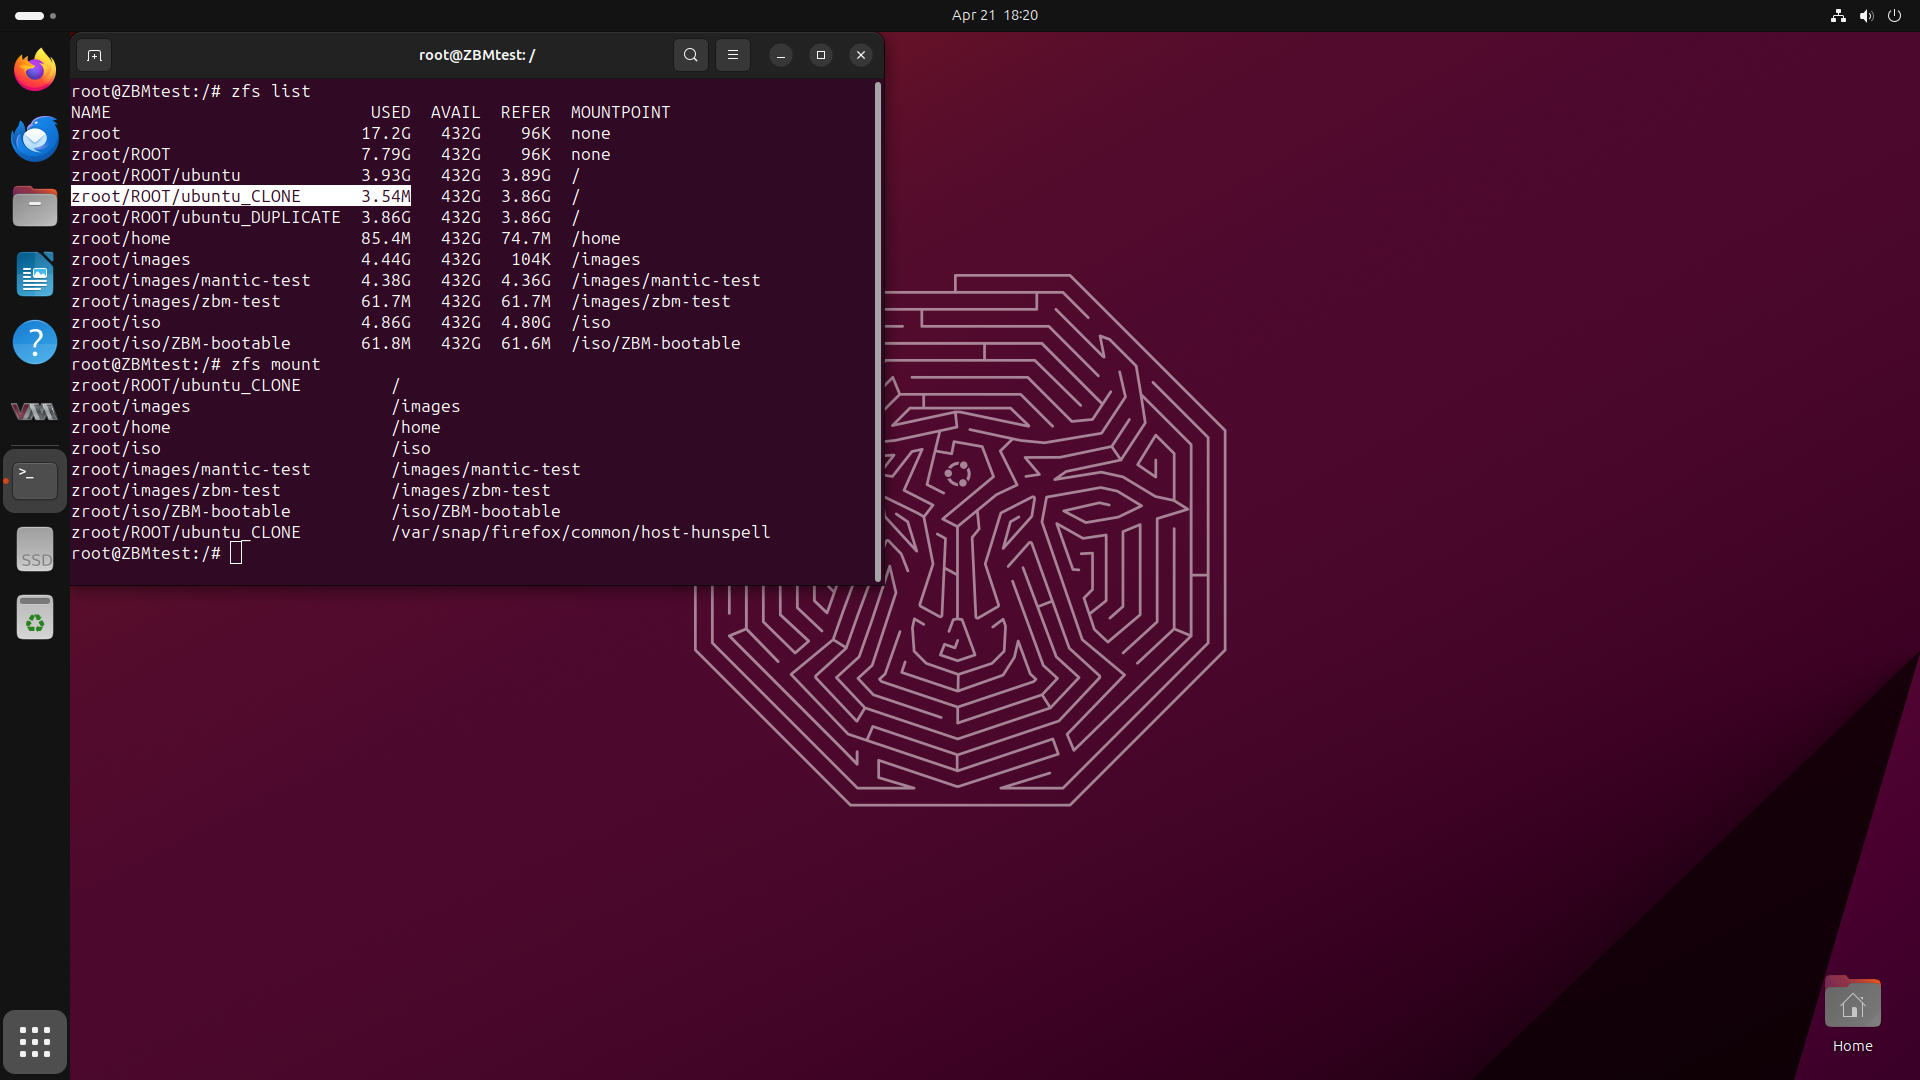
These differences between snapshots, clones, and duplicates become very obvious when we take a closer look at the filesystem afterwards. Clones will occupy very little additional space, while duplicates take up just as much room as if you’d installed the OS a second time from scratch.
Learn more about snapshots and backups in our previous article on ZFS storage best practices.
Multiple Installations
One thing that might not be immediately obvious is that /home isn’t part of these cloning and duplication maneuvers from ZBM. This is because we followed the ZBM project’s instructions and created a separate dataset for /home outside of the OS root dataset.
This setup has a few key implications. Excluding home home folders from any rollback, clone, or duplication efforts may be seen as a feature or a bug, depending on what the user is trying to do. If a user wants to roll their own home folder back, they’ll need to learn how to do that from the command line manually. On the other hand, if the user needs to roll the operating system back but doesn’t want to roll their own home directory back, that’ll happen automatically.
Another potential issue is that sharing a home folder between two different installations can cause corruption. Most applications don’t really trap very carefully for the possibility of older and newer versions of the application sharing the same folder, for example.
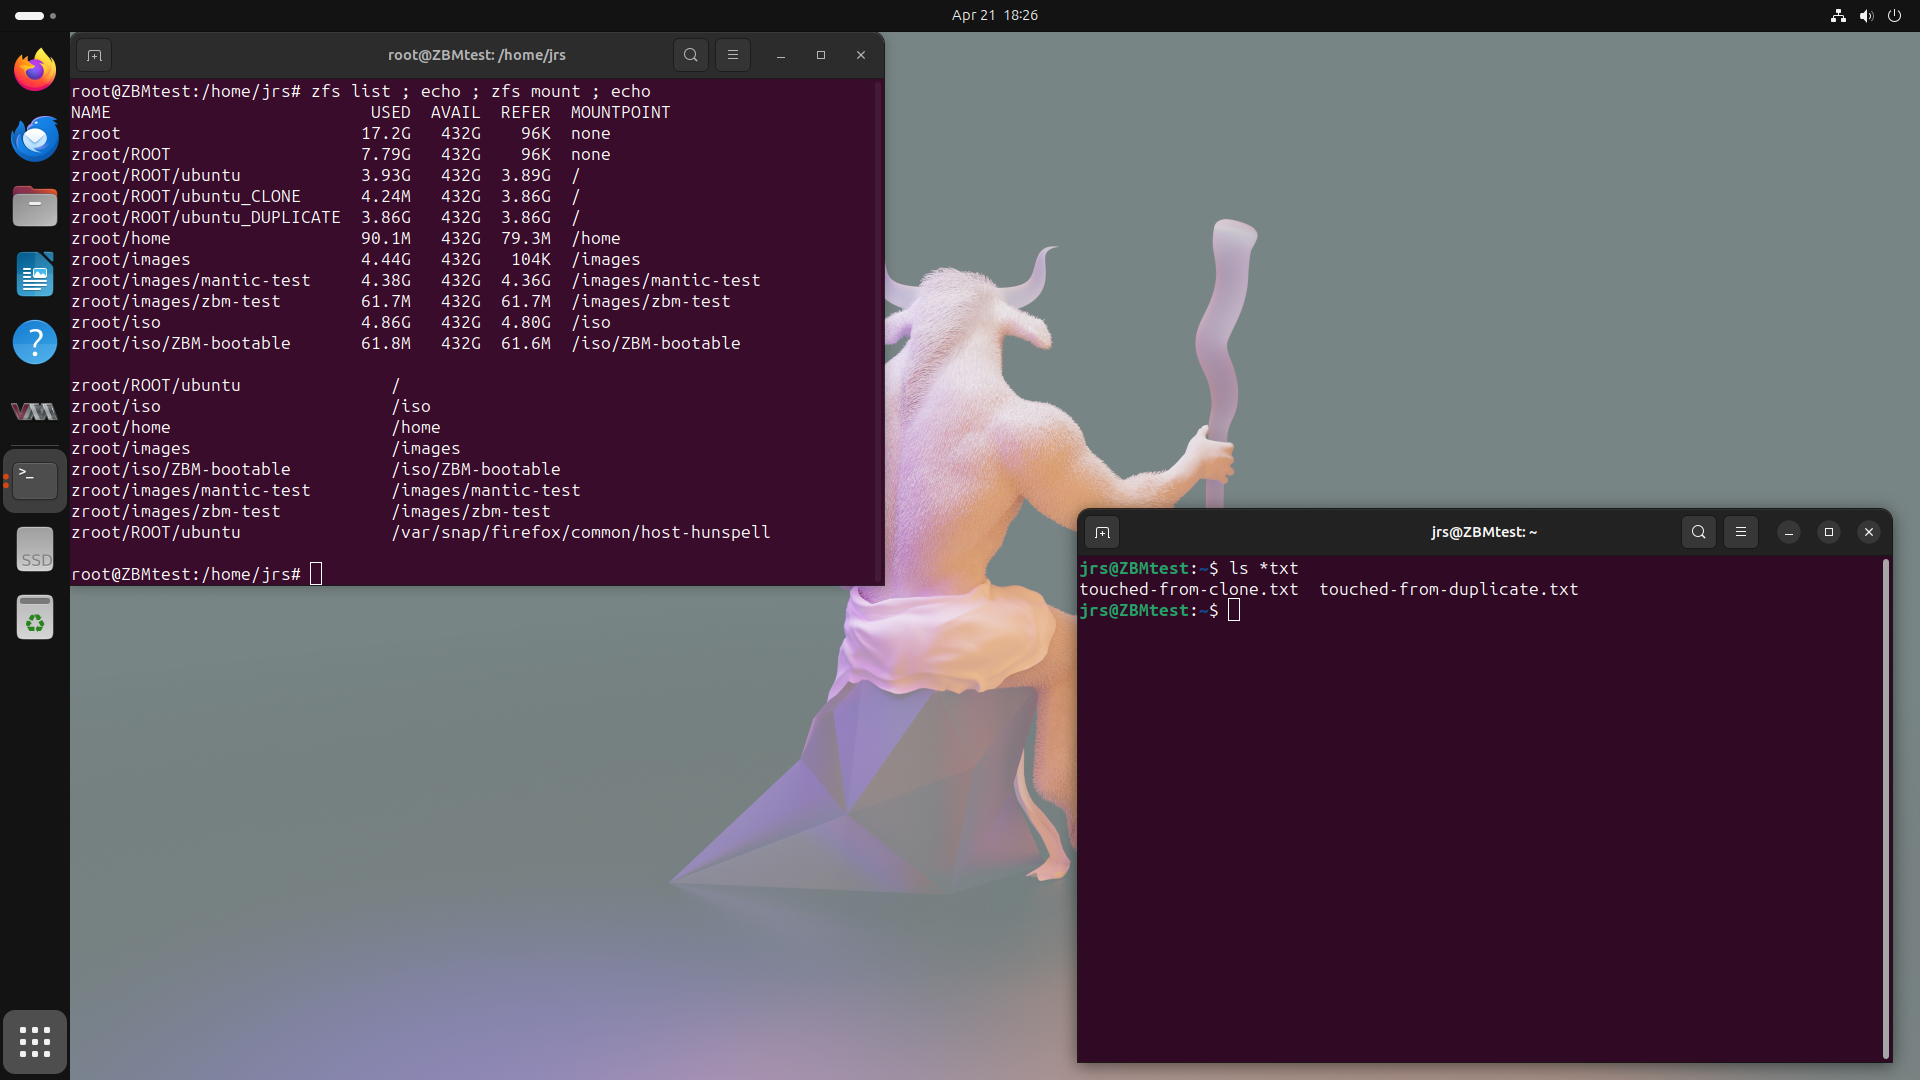
If you think you will want to run multiple operating systems—or even multiple versions of the same operating system—in an ongoing multi-boot environment, you might want to seriously putting your /home dataset in the operating system root and letting it inherit its mountpoint, rather than keeping a separate, “universal” /home as the project docs advise.
Curious to learn more about ZFS boot environments? Check out our detailed article about managing ZFS boot environments.
A Distro-Hopper's dream
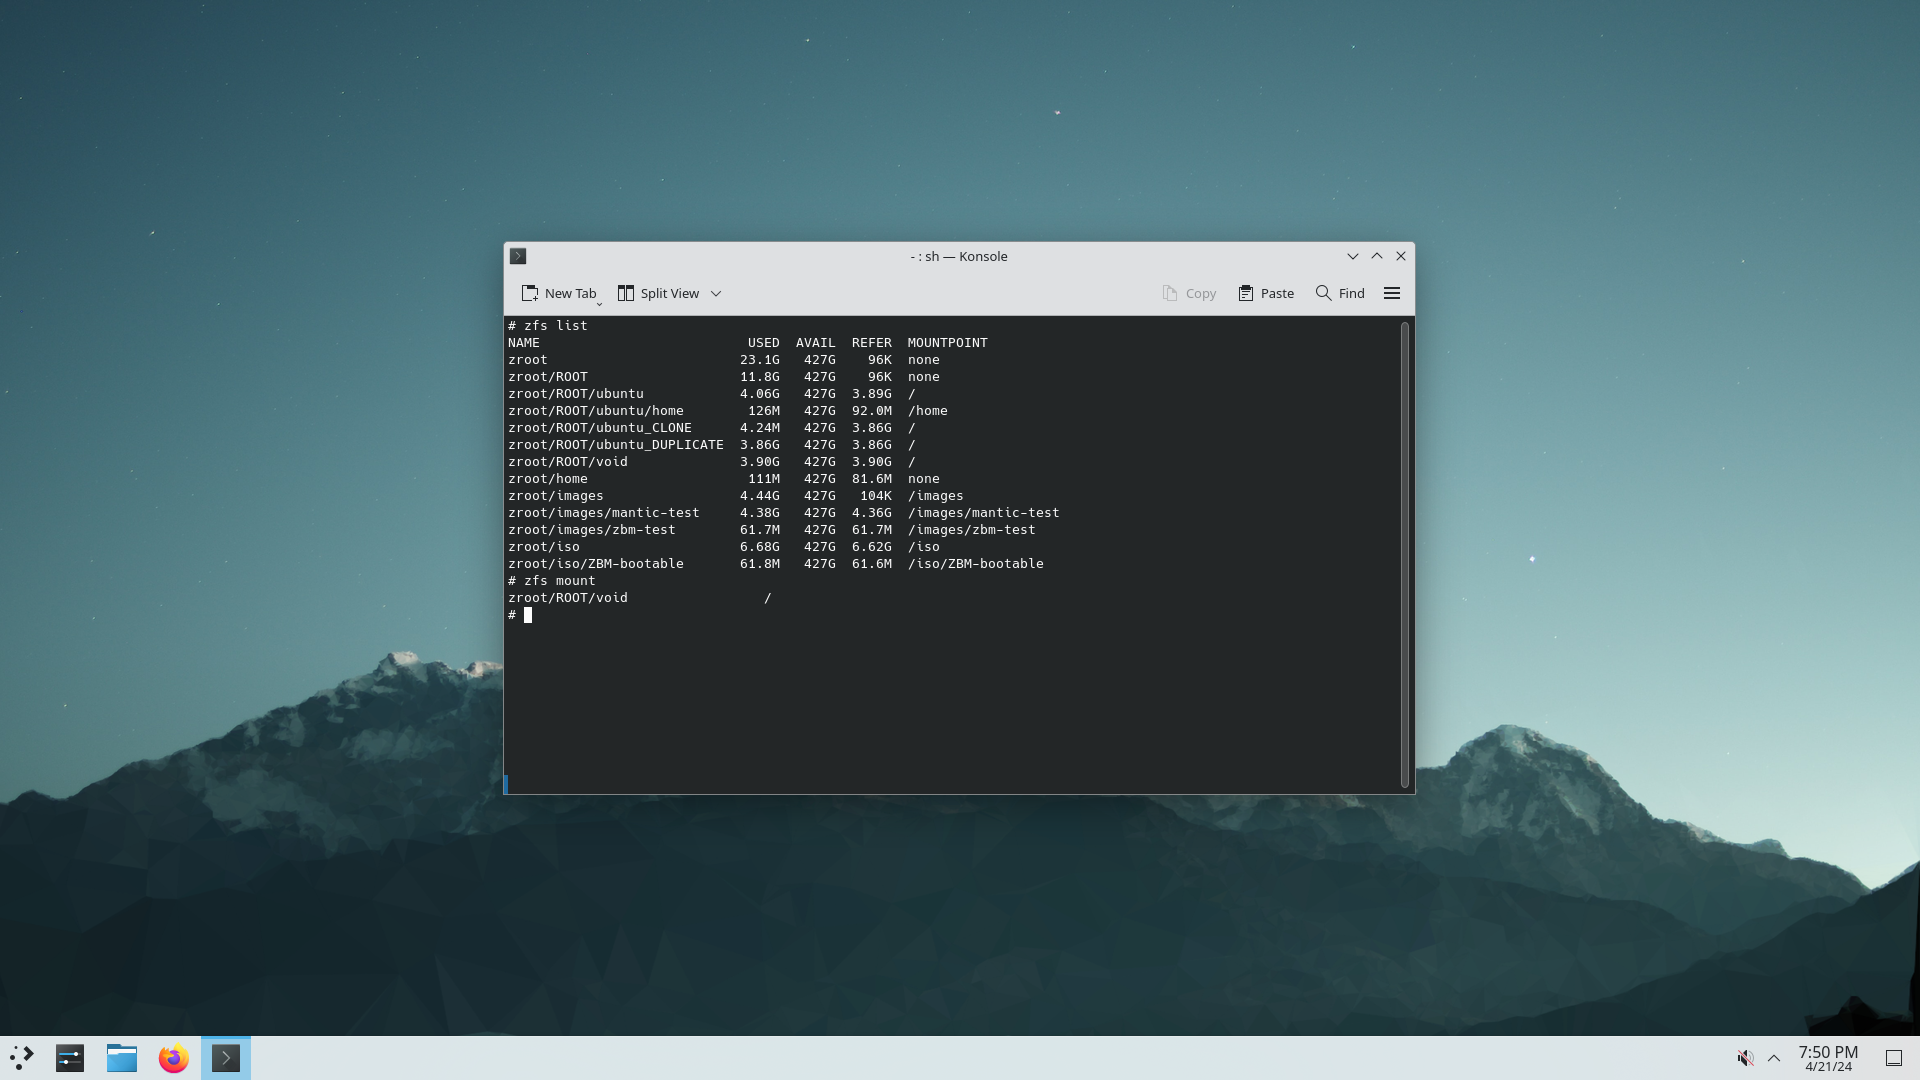
In case it’s not already obvious, ZFSBootMenu is an incredible tool for a distro-hopper to sample Linux distributions easily. Normally, we do this by way of virtual machines—but for some things, there’s no substitute for the genuine on-the-metal experience, and ZBM can give you just that.
When installing a second distro onto an existing ZBM system, just find the ZBM installation document for that distro (for example, Void Linux) and skip the partitioning and pool creation steps. Instead, we did a zfs create zroot/ROOT/void and performed the chroot and installation steps beneath it.
That's all we needed in order to get to the screenshot of a KDE desktop running on Void Linux that you see above. The terminal window displays a zfs list showing us datasets for Void, the original Ubuntu 23.10, and the clone and duplicate copies of our original Ubuntu that we created earlier.
Incredibly Simple Full-System Backup and Restore
The last thought we’ll leave you with is that ZBM finally makes full-system backup and restore of end-user graphical desktop machines simple, affordable, and reliable.
If you’ve installed your desktop OS using ZFSBootMenu, you can use a ZFS replication tool such as syncoid to replicate the entire system across the network. You can even boot that backup directly on another system, if you choose to!
Look closely at the screenshots scattered through this article: you can see that our original Ubuntu installation is at zroot/ROOT/ubuntu and our Void Linux installation is at zroot/ROOT/void.
What if we want to back both installations up to a second machine named banshee?
root@ZBMtest:~# ssh banshee zfs create zroot/backup/ZBMtest
root@ZBMtest:~# syncoid -r zroot/ROOT root@banshee:zroot/backup/ZBMtest/ROOT
That’s all it takes—now banshee will get a full replicated copy of both ubuntu and Void from our ZBMtest machine. Since banshee also boots from ZBM, those backed up installations will show up in banshee’s own ZBM boot menu. They can be booted directly on banshee itself. This means that even with almost no infrastructure or complicated techniques, you can test your backups as fully as possible. You can do this by booting straight into them on the machine you’re backing up to.
ZFSBootMenu for End Users and Professionals
For end users, ZFSBootMenu can be a lifesaver. It helps get you access to the same kind of ZFS tooling and recovery procedures the pros already use. For professionals, ZFSBootMenu offers a useful way to decouple the boot environment from the operating system itself. Once installed, there’s no real “magic” to it, and it’s extremely easy to deploy “gold images” based on real-time, currently-running and fully up to date operating systems. If you're interested in further exploring distributed storage capabilities, check out our article on implementing pNFS with FreeBSD.

Jim Salter
Jim Salter (@jrssnet ) is an author, public speaker, mercenary sysadmin, and father of three—not necessarily in that order. He got his first real taste of open source by running Apache on his very own dedicated FreeBSD 3.1 server back in 1999, and he's been a fierce advocate of FOSS ever since. He's the author of the Sanoid hyperconverged infrastructure project, and co-host of the 2.5 Admins podcast.
Learn About KlaraMaximizing your FreeBSD performance starts with understanding its current state.
A FreeBSD performance audit can help you identify areas for improvement and optimize your systems.


