


Dummynet is a traffic shaper, bandwidth manager and link emulator. Traffic management is an important feature of any router that sits on a network bottleneck. Bottlenecks are created when there is a difference between link speeds or when multiple users are served by a single upstream connection. The boundary between an office or data center network and the provider’s upstream network is a common bottleneck, and in these sorts of situations the internal multi-gigabit network is constricted down into a smaller uplink. When this happens traffic must be buffered and queued.
Did you know? We talked about Dummynet in the past, check it out!
The Internet is a best effort packet network - we send information broken down into packets of data and the network does its best to deliver them, but it doesn’t offer any reliability mechanism. Packet transmission requires buffering. We buffer packets to ensure that they can be stored and sent as the data is carried on a transmission medium, so that it can be reassembled and its validity verified.
It would be possible to build network with only a single packet’s worth of buffering at each hop, but it would be fragile and its ability to transfer data would be low. Instead, routers on the Internet are configured to be able to buffer large numbers of packets.
How we manage packets queued in buffers has an impact on the network conditions that a flow experiences. When there is a lot of traffic in the network, or when there are bursts of traffic in the network, the buffers that hold packets while they are waiting to be transmitted on a link can become full. In this situation, we say the network is congested, like a road with heavy traffic. As congestion increases, it takes longer for packets to transverse the network, and packet latencies start to increase.
When the network is full, it becomes very difficult for new flows to start up. They will see increases in latency and potentially packet loss. If there are constant bit rate flows, such as a video or audio stream, they might push out other traffic entirely.
Sometimes we want to control the amount of bandwidth that a certain application can use. Maybe we want to create a reservation so we can always ssh in to manage hosts when flooded with traffic, or perhaps we want backup jobs to be able to use all of the network when the network is quiet, but only a small percentage when we have more urgent tasks.
Dummynet allows us to control how packets are scheduled and queued by a router through the use of multiple queues and a scheduling algorithm. This article will show an example of configuring a network with Dummynet and then deploying a fair scheduling algorithm to balance traffic.
Test network
We are going to build an example network with a FreeBSD router for our demonstration and test applications that will send traffic over the bottleneck. We will look at how network conditions change on a FreeBSD router without any traffic management, and compare that to using Dummynet to create a bottleneck.
FreeBSD 13.0 is not yet able to use Dummynet in vnet jails (but support is likely to be in 13.1 and is available in FreeBSD 14.0 CURRENT) so we need to either use a dedicated host or a virtual machine for our experiment router.
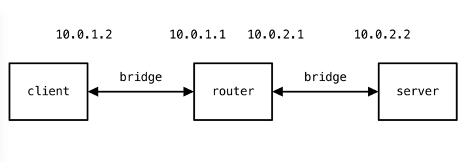
For these examples, we need to configure 3 FreeBSD virtual machines running bhyve. This network is documented in the diagram above. It is worth noting at this point that because we are using virtual machines for our Dummynet router, we will see timing artifacts in its delay emulation due to the emulated clock in the virtual machine. These artifacts won’t appear when using dedicated hardware for the Dummynet router.
With the network configured, it is good to test how quickly we can send traffic across the link and what the latency is in our example.
The Default Network
We are going to use two tools to look at how queue scheduling algorithms affect our traffic, iperf3 and ping. iperf3 is going to be used as a workload generator, and ping is going to be used to measure latency during tests.
For all tests iperf3 is running in server mode on the server host 10.0.2.2 and is run like so:
server $ iperf3 -sWe are going to run tests from the client to show how our network experiences when using different algorithms. We are going to use iperf workload tests that look like:
client $ iperf3 -c 10.0.2.2 -n 10G      # tcp
client $ iperf3 -c 10.0.2.2 -n 10G -u -b 10M    # udp
The first command above runs iperf3 with a TCP workload, while the second command runs an iperf3 UDP workload with a target rate of 10 Megabit/s. In both cases iperf3 is configured to send 10 GigaBytes of data, enough so that we don’t have to worry about the workload transfer ending while we are experimenting with the network.
We are going to use ping with a lower interval than normal to speed up measurements. At high rates ping can easily overload networks (which is why the flood option requires super user privileges). ping with the normal 1 second delay would produce the same results, but would take nearly two minutes to run.
To measure the default network configuration for our host we use the following command:
client # ping -c 100 -i 0.1 -q 10.0.2.2
PING 10.0.2.2 (10.0.2.2): 56 data bytes

--- 10.0.2.2 ping statistics ---
100 packets transmitted, 100 packets received, 0.0% packet loss
round-trip min/avg/max/stddev = 0.386/0.536/0.826/0.076 ms
This command sends 10 packets a second, for 100 packets and suppresses per packet output, only showing us the summary information.
If we run the test again while also running the TCP workload with the command above, we see that packets take longer to traverse the link. However with such a low latency link (these are just virtual machines connected back to back) it isn’t really possible to draw many conclusions from this.
client # ping -c 100 -i 0.1 -q 10.0.2.2
PING 10.0.2.2 (10.0.2.2): 56 data bytes

--- 10.0.2.2 ping statistics ---
100 packets transmitted, 100 packets received, 0.0% packet loss
round-trip min/avg/max/stddev = 0.177/1.910/8.080/1.664 ms
We can use Dummynet to control the bandwidth and delay of individual flows, or an entire link. Next we will use demonstrate how to create a bottleneck and examine how our traffic is treated.
A FIFO Queued Network
Dummynet by default uses a First In First Out (FIFO) scheduling approach. Packets are processed in the order they arrive and are given the same treatment. With the following commands we can configure Dummynet with a bottleneck (10Mbit/s) and add a small delay to make it easier to see how latency changes when we load the network.
router # ipfw pipe 1 config bw 10MBit/s delay 10ms
router # ipfw add 1000 pipe 1 all from 10.0.1.0/24 to any out
With the link configured, but no workload traffic, our ping is now delayed compared to the bare tests above.
client # ping -c 100 -i 0.1 -q 10.0.2.2
PING 10.0.2.2 (10.0.2.2): 56 data bytes

--- 10.0.2.2 ping statistics ---
100 packets transmitted, 100 packets received, 0.0% packet loss
round-trip min/avg/max/stddev = 11.206/16.716/21.129/3.765 ms
The reason we don’t see the exact delay we configured is due to how timers work in virtual machines. Annoyingly this is a very hard problem, real hardware wouldn’t have this issue. If we repeat the above step while running a TCP sender, we can see the impact on our traffic quite clearly:
client # ping -c 100 -i 0.1 -q 10.0.2.2
PING 10.0.2.2 (10.0.2.2): 56 data bytes

--- 10.0.2.2 ping statistics ---
100 packets transmitted, 100 packets received, 0.0% packet loss
round-trip min/avg/max/stddev = 39.930/45.885/59.651/4.526 ms
Our average latency has increased from 16ms to 45ms. We see here that with a FIFO queue model our packets get delayed for much longer when there is load compared to when there isn’t , but they are still able to transverse the network. This is because TCP is using a congestion control algorithm that attempts to estimate the network’s capacity and adapts as other traffic joins the network.
client $ iperf3 -c 10.0.2.2 -n 100G -u -b 1000M >/dev/null &Using UDP, we can flood the network with traffic and stop our ping packets getting through:
client # ping -c 100 -i 0.1 -q 10.0.2.2
PING 10.0.2.2 (10.0.2.2): 56 data bytes

--- 10.0.2.2 ping statistics ---
100 packets transmitted, 81 packets received, 19.0% packet loss
round-trip min/avg/max/stddev = 52.909/65.610/70.768/3.087 ms
We don’t see 100% packet loss, which in some ways is good, but we have a packet loss of around 19%. TCP sees packet loss as a sign of congestion and any loss above a few percent is enough to destroy the performance of a TCP connect and also make it very difficult to establish new connections.
With Dummynet, we can use a queue scheduler to control how traffic passes over the link.
Weighed Fair Queue
The default FIFO scheduler processes packets as it gets them. Dummynet offers a number of different schedulers (and AQM algorithms) to choose from. Here, we will look at wf2q+, the Weighed Fair Queue scheduler which allows flows to share bandwidth based on their weighting.
The WFQ scheduler allows us to set a weight to each type of traffic. The traffic is then fairly scheduled taking these weights into account.
Packets are queued based on a classification and can be further divided into subflows using a mask. When packets are released from the queues, they are fairly treated with the weighting based on the queues’ configuration. Equally weighted queues would take equal turns using the link, whereas higher weighted queues will get more of the resources, but not more than their share according to the weights.
To configure WFQ we need to create a pipe as we did with the FIFO Dummynet example above. On top of the pipe we need to configure the scheduler and create queues for each of the packet classifications we care about.
router # ipfw pipe 1 config bw 10MBit/s delay 10ms
router # ipfw sched 1 config pipe 1 type wf2q+
Here, we configure a pipe as we did above, but this time we add a scheduler using the sched keyword. pipe 1 and sched 1 here refer to specific instance of each. Dummynet supports running many packet schedulers and pipes at the same time, we refer to them with the unique id.
The scheduler needs to have queues configured so it knows how to give priorities to traffic. We will allow icmp to have a small fraction of the bandwidth, UDP about a third and TCP the rest.
router # ipfw queue 100 config sched 1 weight 69 mask all
router # ipfw queue 200 config sched 1 weight 30 mask all
router # ipfw queue 300 config sched 1 weight 1 mask all

router # ipfw add 1000 queue 100 tcp from 10.0.1.0/24 to any out
router # ipfw add 1001 queue 200 udp from 10.0.1.0/24 to any out
router # ipfw add 1002 queue 300 icmp from 10.0.1.0/24 to any out
We have to create queues for each, and then create ipfw rules to feed traffic into those queues.
With the scheduler configured, we are able to share the network capacity between flows while enforcing a maximum share that a queue is allowed to use when there is competing traffic. This means that when there is no competing traffic, a UDP or TCP flow is able to use all the available network bandwidth, but when a second connection comes along, their bandwidth is shared fairly based on the limits that we configured.
We can run our ping test as before with the TCP or UDP workload. This time we don’t see an inflation of latency, and we don’t see packet loss from the competing UDP flow.
client # ping -c 100 -i 0.1 -q 10.0.2.2
PING 10.0.2.2 (10.0.2.2): 56 data bytes

--- 10.0.2.2 ping statistics ---
100 packets transmitted, 100 packets received, 0.0% packet loss
round-trip min/avg/max/stddev = 11.103/17.111/21.092/3.478 ms
Further, we can run the TCP or UDP workload on their own and they will get all of the bottleneck’s capacity, but if we run them simultaneously their share of the link is divided down until that have approximately a 70/30 split of the bandwidth.
Conclusions
Dummynet is a powerful part of FreeBSD, and it can be used to create many network topologies with many different characteristics. Dummynet features many different scheduling algorithms - each is designed to help make traffic treatment fairer in different situations. Many are evolutions of others and aim to fix the problems with previous attempts. It is worth reading about their up and downsides and experimenting with them before picking one to use on production traffic. Dummynet provides us the power to control how traffic at bottlenecks is treated and can be used to make reservations on our hosts so they remain reachable when under high packet load.